The Best No-Fail Fermentation Recipes to Try Today
Why Home Fermentation Recipes are a Gut-Health Game Changer
When we talk about home fermentation recipes, we aren’t just talking about a hobby; we are talking about a massive upgrade to your internal ecosystem. As of April 2026, the scientific community has further solidified what traditional cultures have known for millennia: fermented foods are a powerhouse for the human body.

The magic lies in the diversity of probiotics. While a store-bought supplement might offer three or four specific strains of bacteria, a single jar of homemade sauerkraut can contain dozens of different species of lactic acid bacteria. These microbes don’t just sit there; they actively pre-digest the food, making nutrients like B vitamins and Vitamin K2 more bioavailable for your body to absorb.
Furthermore, the fermentation process creates digestive enzymes that help your gut break down other foods more efficiently. By regularly consuming these “live” foods, you are essentially sending a constant stream of reinforcements to your immune system. However, to reap these benefits, you must ensure your environment is hospitable to the “good guys” and hostile to the “bad guys.” To learn more about keeping your kitchen safe, check out Safety First: A Guide to Preserving Fermented Foods.
Essential Equipment for Home Fermentation Recipes
You don’t need a laboratory to start fermenting, but having the right tools makes the process “no-fail.” Here is what we recommend for every beginner’s kit:
- Mason Jars: Wide-mouth quart or half-gallon jars are the industry standard. They are easy to clean and fit most accessories.
- Fermentation Weights: These are glass or ceramic discs that sit on top of your vegetables. Their sole job is to keep everything submerged under the brine. Remember the golden rule: “Under the brine, all is fine.”
- Airlock Lids: These allow carbon dioxide to escape without letting oxygen (and mold spores) in. If you don’t have these, you’ll need to “burp” your jars daily.
- Digital Scale: This is perhaps the most important tool. Measuring salt by weight (grams) is far more accurate than using tablespoons, ensuring a perfect 2% or 3% salinity every time.
- Vegetable Pounder: A wooden tool used to bruise cabbage and pack it tightly into jars.
For a deeper dive into the fundamentals of food prep, visit our guide on Preserving Basics.
Mastering Salt Ratios in Home Fermentation Recipes
Salt is the “security guard” of fermentation. It inhibits spoilage bacteria while allowing salt-tolerant lactic acid bacteria to thrive.
We always use non-iodized salt, such as sea salt or pickling salt. Why? Because iodine and anti-caking agents found in table salt can turn your brine cloudy or even stall the fermentation process entirely. We also recommend using filtered or dechlorinated water, as chlorine can kill the very microbes we are trying to grow.
Common salt ratios include:
- 2% Brine: Ideal for sauerkraut and most shredded vegetables. (20g salt per 1000g of vegetable/water).
- 3.5% Brine: Better for cucumbers and peppers to maintain crunch and prevent mushiness.
If you find you’ve been a bit too heavy-handed with the shaker, don’t panic! You can learn How to Save Your Salty Snacks to balance out the flavor.
Top 5 Beginner-Friendly Fermentation Recipes
If you are looking for home fermentation recipes that offer a high success rate, these five are our favorites. Whether you prefer the traditional brine method, the modern ease of vacuum sealing, or the sweet tang of sugar fermentation, there is something here for everyone. Explore our full collection of Fermented Recipes for even more inspiration.

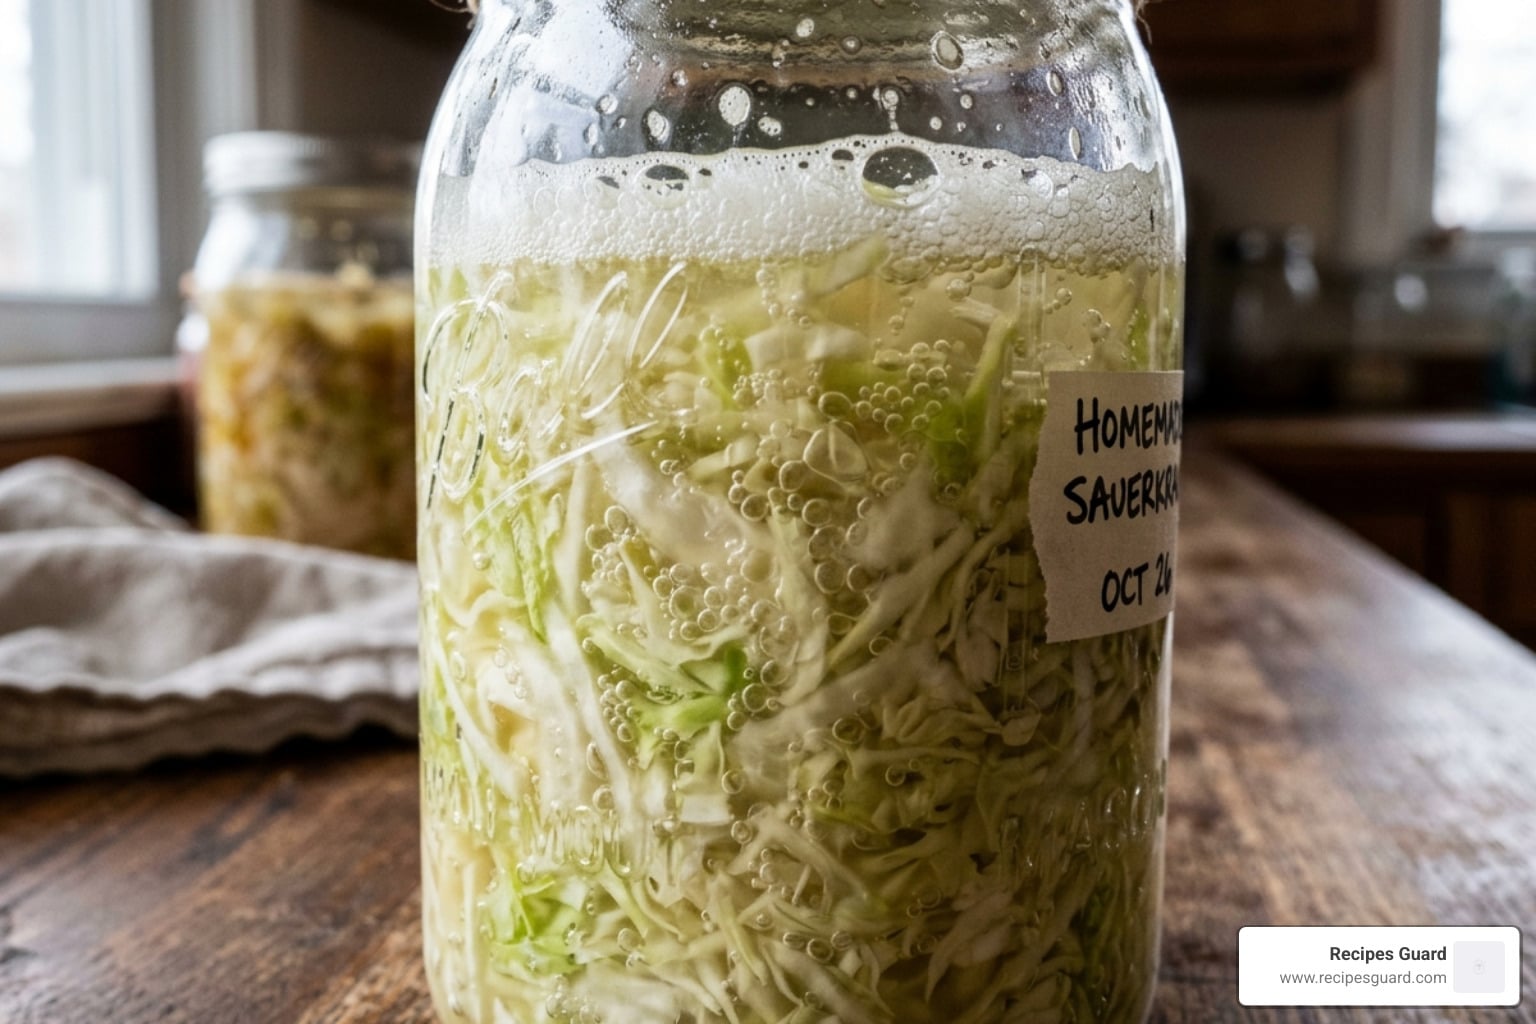
1. The Gateway Ferment: Two-Ingredient Sauerkraut
Sauerkraut is the ultimate “gateway ferment.” It requires only cabbage and salt. By shredding the cabbage and massaging it with salt for 5–10 minutes, you break down the cell walls and create a natural brine from the cabbage’s own juice.
We recommend the 2% salt rule: weigh your shredded cabbage in grams and multiply by 0.02. That is exactly how much salt you need. For a classic German twist, add a teaspoon of caraway seeds or juniper berries.
| Temperature | Fermentation Time | Flavor Profile |
|---|---|---|
| 75°F (24°C) | 1 Week | Mild, slightly crunchy |
| 68°F (20°C) | 3 Weeks | Classic tang, complex |
| 60°F (15°C) | 6+ Weeks | Intensely sour, soft texture |
2. Traditional Korean Kimchi (Mak Kimchi)
Kimchi is a vibrant, spicy staple that has been perfected over centuries. While there are hundreds of varieties, “Mak Kimchi” (simple, chopped kimchi) is the best entry point for home cooks.
The soul of kimchi is gochugaru—a sun-dried Korean red chili powder that provides a smoky, fruity heat. You’ll also need aromatics like garlic, ginger, and scallions. For that deep umami flavor, fish sauce is traditional, though vegans can easily substitute miso paste or soy sauce.
The process involves dry-brining napa cabbage until it’s limp, rinsing it, and then tossing it in a spicy paste. It ferments quickly—usually just 2–3 days at room temperature before it’s moved to the fridge. For a visual guide, check out this Kimchi Recipe (with Video).
3. Deli-Style Half-Sour and Full-Sour Pickles
Nothing beats the snap of a real fermented pickle. Unlike grocery store pickles, which are often just cucumbers boiled in vinegar, these are “alive.”
To ensure the best results, use Kirby cucumbers (small pickling varieties) and trim the blossom end, which contains enzymes that can make pickles mushy. We also recommend adding tannins—found in grape leaves, bay leaves, or black tea bags—to keep the cucumbers crisp.
A “half-sour” pickle is fermented for about 3–4 days, while a “full-sour” takes 5–7 days. Don’t be alarmed if the brine turns cloudy; that’s just the lactic acid bacteria doing their job! For those who want faster results, you can also look into Quick and Easy Pickled Vegetables for Every Meal.
4. Probiotic Condiments: Hot Sauce and Garlic
Once you’ve mastered vegetables, it’s time to move to condiments. Fermented hot sauce has a depth of flavor that vinegar-based sauces can’t touch. By fermenting habaneros or jalapeños in a 3% brine for a week before blending, you mellow the harsh heat and unlock a complex acidity. Learn the specifics in our guide to Mastering the Art of Lacto-Fermented Hot Sauce.
Another “set it and forget it” favorite is fermented honey garlic. Simply submerge peeled garlic cloves in raw honey. Over several weeks, the honey will thin out and the garlic will lose its “bite,” becoming a sweet, savory, probiotic treat. Don’t Be Afraid of the Funk with This Easy Fermented Garlic Recipe covers everything you need to know about this medicinal powerhouse.
5. Fermented Beverages: Kombucha and Beet Kvass
Fermentation isn’t just for eating; it’s for drinking, too!
- Kombucha: This requires a SCOBY (Symbiotic Culture of Bacteria and Yeast) and sweetened black tea. It’s a two-stage process: a primary ferment for the tang, and a secondary ferment in sealed bottles with fruit to create carbonation.
- Beet Kvass: Often called a “blood tonic” in Eastern Europe, this is made by fermenting beets in salt water. It has an earthy, salty, and slightly sour flavor that is incredibly refreshing. You can even use fruit scraps to add a lighter, sweeter note to the finished tonic.
Troubleshooting and Safety: How to Avoid Spoilage
One of the biggest hurdles for beginners is the fear of “bad” bacteria. However, with the right salt ratio and an anaerobic (oxygen-free) environment, spoilage is actually quite rare.

Here is how to tell the difference between “the funk” and “the fail”:
- Kahm Yeast: A thin, white, matte film on the surface. It is harmless but can affect flavor. Skim it off and keep going.
- Mold: Fuzzy, hairy, and often colorful (blue, green, black, or pink). If you see fuzzy mold, discard the batch.
- Odors: A healthy ferment smells tangy, vinegary, or “yeasty.” If it smells putrid, like rotting garbage or old gym socks, toss it.
- Texture: Vegetables should remain relatively firm. If they become slimy or disintegrate when touched, the temperature was likely too high.
Signs your ferment is safe to eat:
- The brine is cloudy (this is good!).
- You see active bubbling or “fizz.”
- The pH is 4.6 or lower (ideally between 3.3 and 3.8).
- The smell is pleasantly sour.
Storage Guidelines and Creative Culinary Uses
Once your home fermentation recipes have reached the perfect level of tang, move them to the refrigerator. Cold temperatures (34–40°F) slow the bacteria down significantly, allowing you to enjoy your ferments for 6 months or even longer.
Don’t just eat them out of the jar! Here are some creative ways to use your ferments:
- The Ultimate Reuben: Use your homemade sauerkraut with corned beef and Swiss cheese.
- Probiotic Dressings: Whisk a tablespoon of kimchi or sauerkraut brine into your favorite vinaigrette.
- Grain Bowls: Top quinoa or farro with fermented carrots and avocado for a gut-healthy lunch.
- Gut Shots: Take a small sip of the leftover brine (the “liquid gold”) in the morning for a quick probiotic boost.
- Charcuterie Boards: Fermented pickles and garlic are the perfect acidic balance to rich cheeses and cured meats.
Frequently Asked Questions about Fermenting at Home
How long does it take for vegetables to ferment?
The timeline depends entirely on temperature and your personal taste. In a warm kitchen (above 75°F), a ferment might be ready in 3 days. In a cooler basement (60°F), it could take 4 weeks. We recommend tasting your ferment starting at day 3. When it tastes good to you, it’s done!
Is the white film on top of my jar dangerous?
Usually, no. This is likely Kahm yeast, a non-pathogenic yeast that forms when the surface of the brine is exposed to oxygen. While it isn’t dangerous, you should skim it off to prevent it from giving your vegetables a “cheesy” or off-flavor. Using an airlock lid is the best way to prevent it.
Can I ferment without specialized equipment?
Absolutely. Before we had fancy glass weights, people used clean stones or even a Ziploc bag filled with extra brine to weigh down their vegetables. You can also use a large, clean cabbage leaf tucked over the top of your kraut to keep the small bits from floating. The most important thing is maintaining basic hygiene and the correct salt ratio.
Conclusion
At Recipes Guard, we believe that food preservation is more than just a way to save money—it’s a way to reclaim our connection to what we eat. Whether you are starting with a simple jar of sauerkraut or diving into the complex world of kombucha, these home fermentation recipes are your first step toward a more sustainable and healthy lifestyle.
As we look at the food trends of April 2026, it is clear that “slow food” is making a massive comeback. Fermentation teaches us patience, rewards us with incredible flavors, and supports our health in ways that modern processing simply cannot.
Ready to get started? Grab a cabbage, some sea salt, and start your fermentation journey today. Happy fermenting!