The Essential Guide to Keeping Your Starter Alive
Why Keeping Your Sourdough Starter Alive Is Simpler Than You Think
How to keep your sourdough starter alive comes down to a few consistent habits: feed it regularly, store it correctly, and pay attention to what it’s telling you.
Here’s the short version:
- Feed it with equal parts starter, flour, and water by weight (1:1:1 ratio)
- Store at room temperature and feed once daily if you bake frequently
- Store in the fridge and feed once a week if you bake less often
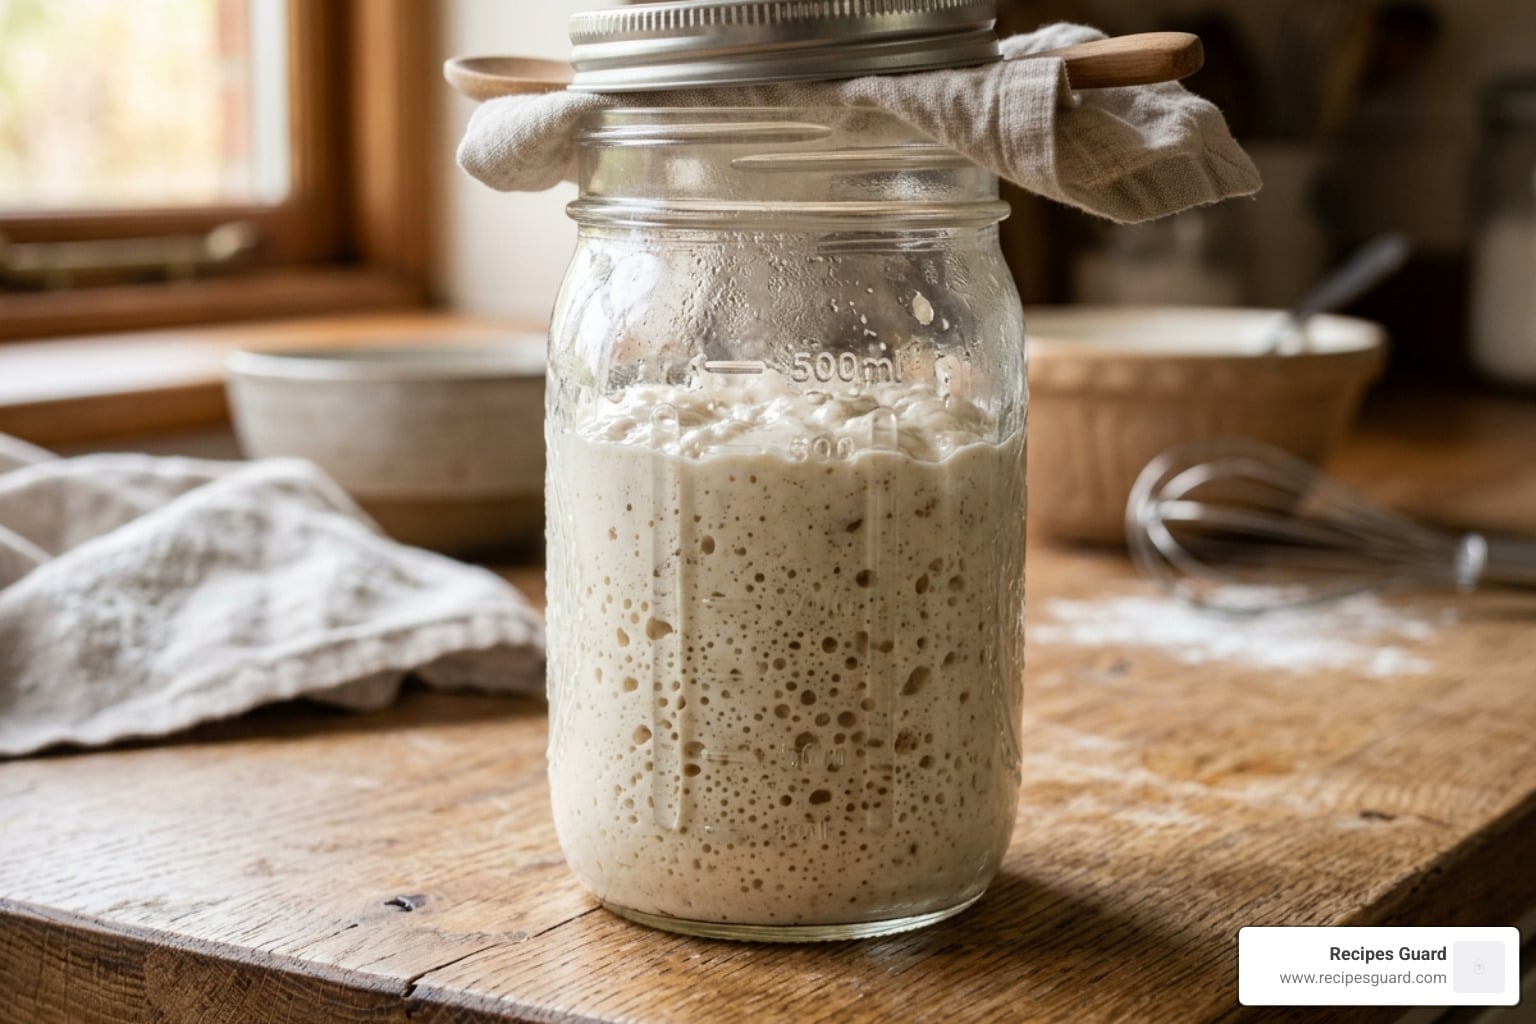
- Look for bubbles, a domed top, and a doubling in size — these mean it’s healthy
- Revive a neglected starter with 2-3 feedings over 48 hours before baking
A sourdough starter is a living culture of wild yeast and beneficial bacteria. It needs fresh flour and water to survive — that’s its food source. Without regular feeding, the microbes run out of nutrients, produce too much acid, and eventually go dormant or die.
The good news? Starters are far more resilient than most people expect. A starter stored in the fridge can survive for weeks — sometimes even months — and bounce back with just a few feedings.
Whether you’ve just received your first starter or you’re trying to rescue one that’s been sitting forgotten in the back of your fridge, this guide covers everything you need to know.

Understanding Your Sourdough Starter and Why Maintenance Matters
To master how to keep your sourdough starter alive, we first need to understand what is happening inside that jar. A sourdough starter is a symbiotic culture of wild yeast and lactic acid bacteria (specifically lactobacilli). Think of it as a tiny, invisible pet. The yeast provides the leavening power (the bubbles that make bread rise), while the bacteria provide that signature tangy flavor and help protect the starter from “bad” bacteria by increasing its acidity.
When we talk about maintenance, we are really talking about managing this microbial balance. Every time we feed our starter, we are introducing new sugars for the yeast to eat. As they consume these sugars, they produce carbon dioxide and ethanol. This gas is what causes the starter to expand and “double in size.”
However, as the yeast and bacteria eat, they also produce waste products—acids. If the starter sits too long without fresh food, it becomes overly acidic. This high acidity can eventually become toxic even to the “good” microbes, causing the starter to smell like vinegar or old gym socks and lose its strength. By following proper Safety First: A Guide to Preserving Fermented Foods, we ensure that our starter remains a healthy environment where only the beneficial microbes thrive.
In our current baking landscape of April 2026, we’ve moved away from the idea that starters are fragile. They are actually quite tough. When you put a starter in the fridge, the yeast enters a state of dormancy. Their metabolism slows down significantly, which is why they don’t need to eat every day. Understanding this cycle—from active feeding to peak rise and eventual dormancy—is the secret to stress-free sourdough.
How to Keep Your Sourdough Starter Alive with Proper Feeding
Feeding is the most critical part of the process. If you want to know how to keep your sourdough starter alive, you have to get comfortable with the “refreshment” process.

The Basic Feeding Ratio: 1:1:1
The standard starting point for feeding is a 1:1:1 ratio by weight. This means you take one part “seed” starter, one part flour, and one part water. For example:
- 50g starter
- 50g flour
- 50g water
This ensures your starter has enough food to stay active for about 24 hours at room temperature. However, many experienced bakers prefer the “gold standard” 1:2:2 ratio (e.g., 25g starter, 50g flour, 50g water). This higher ratio of fresh food to old starter helps keep the acidity in check and can lead to a more balanced, less “sour” flavor in your final bread.
Tools and Ingredients
To do this right, we highly recommend using a digital kitchen scale. Measuring by volume (cups and spoons) is notoriously inaccurate because flour can be packed tightly or aerated. If you must use cups, aim for a thick, pancake-batter consistency.
For ingredients, we suggest:
- Unbleached Flour: Bleaching chemicals can sometimes hinder wild yeast growth. All-purpose or bread flour works great. You can learn more about different flour types and their protein content to see how they affect your starter’s structure.
- Filtered Water: If your tap water is heavily chlorinated, it can inhibit fermentation. You can also let tap water sit out overnight to allow the chlorine to evaporate.
For more on the fundamentals of keeping your kitchen stock ready for fermentation, check out our section on Preserving Basics.
Daily Maintenance: How to Keep Your Sourdough Starter Alive at Room Temperature
If you are baking several times a week, keeping your starter on the counter is the way to go. At a typical room temperature of 75°F (23°C), a healthy starter will follow a predictable 24-hour cycle.
- Discard: Remove most of your starter, leaving just the amount you need for your feeding ratio.
- Feed: Mix in your fresh flour and water. Stir thoroughly until no dry clumps remain. This oxygenates the mixture, which yeast loves.
- Mark: Use a rubber band or a dry-erase marker to indicate the starting level.
- Observe: Over the next 6-8 hours, the starter should double (or even triple) in volume. This is “peak ripeness.”
Learning to read these visual cues is essential so you can How to Master the Traditional Sourdough Bread Recipe Without Losing Your Mind and bake at the perfect moment.
Long-Term Storage: How to Keep Your Sourdough Starter Alive in the Fridge
Most of us don’t bake every single day. If you’re a weekend warrior, the refrigerator is your best friend. Cold temperatures slow down the microbes’ metabolism, allowing you to go much longer between feedings.
To store in the fridge:
- Feed your starter at a 1:1:1 or 1:2:2 ratio.
- Let it sit at room temperature for about 1-2 hours to “kickstart” the fermentation.
- Seal it with a lid and pop it in the fridge.
- Feed it once a week to keep it in peak health.
When you’re ready to bake, take it out 24-48 hours in advance. It might need two “revival feeds” at room temperature to regain its full strength before it’s ready to lift a loaf of bread. This is a common practice in many Fermented Recipes where temperature control is used to manage the pace of fermentation.
Troubleshooting Common Starter Issues and Sluggishness
Even the best-kept starters run into trouble occasionally. Don’t panic—it’s rarely a death sentence.
Dealing with Hooch
If you see a thin, dark, or clear liquid sitting on top of your starter, congratulations! You’ve found “hooch.” This is simply an alcohol byproduct of fermentation. It’s a sign that your starter is very hungry and has exhausted its food supply.
- The Fix: You can either pour it off or stir it back in for extra tang. Then, give your starter a good feeding.
Sluggish Activity
Is your starter bubbling but not rising? Or is it taking 12+ hours to double? This usually happens if the environment is too cold or the starter has become too acidic.
- The Fix: Try using warm water (around 80°F) for your next feeding. You can also give it a “superfood” boost by replacing 20% of your white flour with rye flour. Rye is packed with nutrients and amylase enzymes that act like rocket fuel for yeast.
The Smell Test
A healthy starter should smell yeasty, fruity, or slightly vinegary. If it starts to smell like Why Does My Sourdough Smell Like Old Gym Socks?, it’s likely over-fermented and needs more frequent feedings or a higher feeding ratio to reduce acidity.
| Sign | Healthy Starter | Struggling Starter |
|---|---|---|
| Aroma | Yeasty, sweet, or mildly tangy | Putrid, like gym socks, or acetone |
| Appearance | Bubbly, domed top, doubled size | Flat, watery, or has a dark liquid layer |
| Texture | Spongy and thick | Runny and thin |
| Mold | None | Fuzzy spots (White, Black, Pink) |
Important: If you see actual fuzzy mold (pink, green, or black), it’s time to say goodbye and start over. Safety first!
Essential Tools and Ingredients for Success
While you don’t need a lab full of equipment, a few specific tools make how to keep your sourdough starter alive much easier.
- Glass Jars: We prefer glass over plastic because it doesn’t absorb odors and you can easily see the bubbles. Straight-sided jars (like Weck jars) make stirring and cleaning much easier than jars with “shoulders.”
- Breathable but Secure Covers: You want to keep fruit flies out without creating a pressure bomb. A loose-fitting lid or a cloth with a rubber band works perfectly.
- Digital Scale: As mentioned, weight is king. Consistency is the only way to troubleshoot effectively.
- Temperature Probe: If your kitchen is cold (below 70°F), your starter will be sluggish. Knowing the temperature of your water and your starter environment helps you adjust.
Regarding ingredients, always remember that the flour you feed your starter is what it becomes. If you want to bake a hearty whole-grain loaf, feeding your starter some whole wheat or rye can help prepare the yeast for that specific grain.
Frequently Asked Questions about Sourdough Maintenance
What should I do with sourdough discard and why is it important?
Discarding is the part of sourdough that pains new bakers the most. “Why am I throwing away food?” we hear you ask. Discarding serves two purposes:
- Size Management: If you didn’t discard, and you kept doubling the starter every day, you’d have enough starter to fill a swimming pool within weeks.
- Acidity Control: Discarding removes the built-up lactic acid, ensuring the fresh flour and water can effectively lower the pH and “refresh” the environment.
The good news is that “discard” isn’t waste. You can keep a jar of discard in your fridge and use it for pancakes, waffles, crackers, or brownies. It adds a wonderful depth of flavor without needing the leavening power of an active starter.
Can I overfeed or neglect my starter?
It is very hard to “overfeed” a starter, though if you feed it too frequently before it has a chance to peak, you might dilute the yeast population.
Neglect is more common. If you forget a feeding for a few days at room temperature, it will look sad and smell like nail polish remover (acetone). Don’t throw it out! Usually, 2-3 feedings every 12 hours will bring it back to life. Statistics show that even starters left in the fridge for a year can often be revived with a week of dedicated feedings.
When is my starter officially ready for baking?
A starter is ready when it is “ripe.” This is usually 4–8 hours after feeding.
- Visuals: It has at least doubled in size and has a rounded (domed) top. If the top is flat or starting to sink, it’s past its peak.
- The Float Test: Drop a small teaspoon of starter into a glass of water. If it floats, it’s full of carbon dioxide and ready to bake. (Note: This doesn’t always work with heavy whole-grain starters, so visual cues are more reliable).
Conclusion
At Recipes Guard, we believe that fermentation shouldn’t be a source of stress. Learning how to keep your sourdough starter alive is about finding a rhythm that fits your life, not the other way around. Whether you keep a tiny “scrapings” starter in the fridge or a large jar on your counter, the goal is the same: a healthy, bubbly culture ready to make delicious bread.
By understanding the microbial balance, using the right tools, and knowing how to troubleshoot sluggishness, you’ve mastered the art of preservation. Now that your starter is healthy, why stop at bread? Explore more fermented recipes and guides to see how you can use these same principles for everything from pickles to kombucha. Happy baking!