Sterilize Your Jars Without the Stress
Why Getting Canning Jars Sterilization Methods Right Matters for Safe Food Preservation
Canning jars sterilization methods determine whether your preserved food stays safe to eat — or becomes a source of spoilage and illness.
Here’s a quick answer to get you started:
The most important things to know:
- Only one method is USDA-approved: boiling jars in water for a minimum of 10 minutes (at altitudes under 1,000 feet)
- Pre-sterilization isn’t always required: if your recipe processes jars for 10 or more minutes, sterilization happens automatically during canning
- Pre-sterilization IS required: for jams, jellies, and pickled products with processing times under 10 minutes
- Pressure canning: never requires pre-sterilization — the high heat handles it
- Lids: do not boil — just wash with warm soapy water
- Altitude matters: add 1 minute of boiling time per 1,000 feet above 1,000 feet elevation
So you’ve got a counter full of cucumbers, peaches, or garden tomatoes and you want to preserve them properly. You’ve probably seen a dozen different methods online — oven sterilization, microwave tricks, dishwasher cycles, vinegar soaks. It can feel overwhelming fast.
The good news? Most of that complexity is unnecessary.
Understanding exactly when and how to sterilize your jars removes the guesswork — and keeps your food (and your family) safe all year long.

Understanding When to Use Canning Jars Sterilization Methods
When we dive into home preservation, the first thing we need to clarify is that “clean” and “sterile” are two different worlds. You can have a jar that looks sparkling clean but still harbors microscopic spores of yeast, mold, or bacteria that can ruin a batch of expensive organic peaches.
However, we have some good news for those of you looking to save time: you don’t always have to pre-sterilize. The decision to use specific canning jars sterilization methods depends entirely on your recipe’s processing time.
When Pre-Sterilization is Mandatory
At Recipes Guard, we follow the strict safety guidelines established by the USDA and the National Center for Home Food Preservation. Pre-sterilization is mandatory if—and only if—your recipe calls for a water bath processing time of less than 10 minutes.
This most commonly applies to:
- Delicate jams and jellies.
- Certain pickled products where a long boil would ruin the texture.
- Fruit juices.
If your timer is set for 5 or 8 minutes, those jars must be sterilized in boiling water before the food ever touches the glass. This ensures that any lingering microbes are dead before the short processing cycle begins. For more on the foundation of these rules, check out our guide on Safety First: A Guide to Preserving Fermented Foods.
When Processing Achieves Sterilization
If your recipe requires 10 minutes or more in a boiling water bath, or if you are using a pressure canner, you can skip the pre-sterilization step. Why? Because the heat required to process the food is sufficient to sterilize the jar at the same time.
For pressure canning—which is used for low-acid foods like meats and vegetables—the internal temperatures reach 240°F to 250°F. This is more than enough to kill even the most stubborn spores, including Clostridium botulinum. In these cases, simply washing the jars in hot, soapy water and keeping them warm until filling is the gold standard. To learn more about these entry-level techniques, visit our section on Preserving Basics.

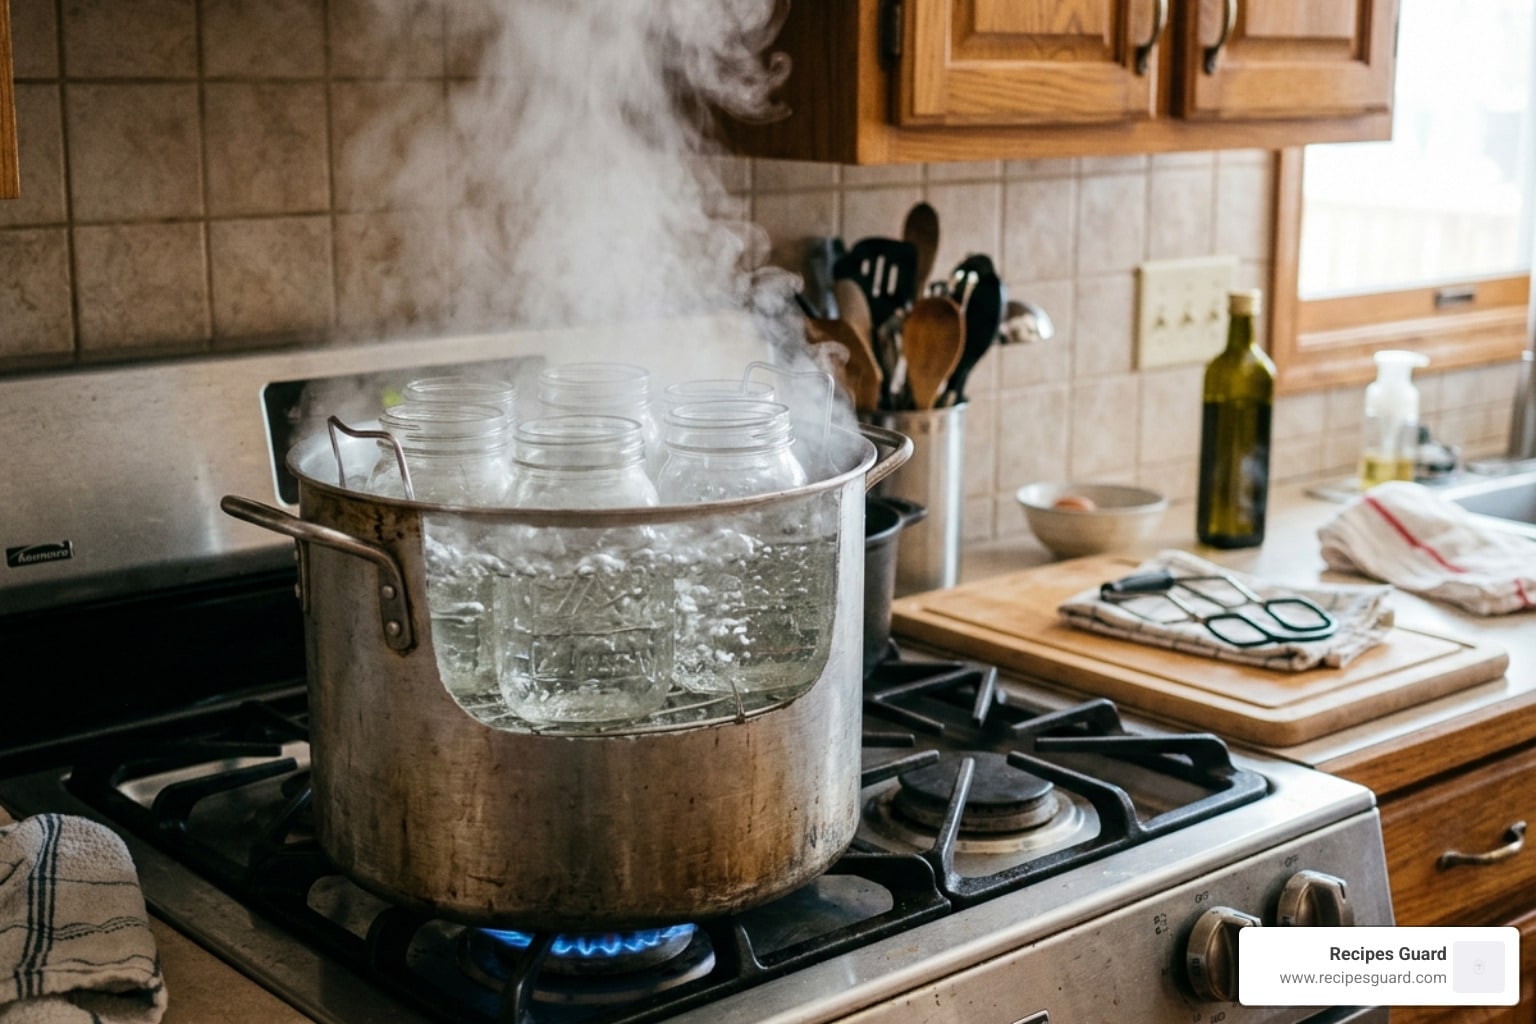
The USDA-Approved Boiling Water Method
If you’ve determined that your recipe requires pre-sterilization, there is only one method officially recognized as safe by the National Center for Home Food Preservation: the boiling water method.
To do this correctly, you’ll need a few specific tools:
- A deep stockpot or water bath canner: It must be tall enough to cover the jars with at least one inch of water.
- A canning rack: This sits at the bottom of the pot to prevent the jars from touching the direct heat of the burner, which can cause them to crack.
- A jar lifter: These specialized tongs are essential for moving hot jars safely without burning yourself or dropping the glass.
Step-by-Step Canning Jars Sterilization Methods
Follow these steps to ensure your jars are 100% ready for your preserves:
- Wash the jars: Even if they are brand new, wash them in hot, soapy water to remove dust or glass fragments.
- Place on the rack: Put the empty jars right-side-up on the rack inside your canner.
- Fill with water: Fill the pot (and the jars) with hot (not boiling) water until the water level is at least one inch above the tops of the jars.
- Bring to a boil: Turn up the heat. Once the water reaches a full, rolling boil, start your timer.
- Boil for 10 minutes: This is the standard time for altitudes under 1,000 feet.
- Keep them hot: When the time is up, turn off the heat but leave the jars in the hot water until you are ready to fill them. This prevents “thermal shock,” which happens when hot food hits a cold jar and causes the glass to shatter.
Adjusting for Altitude and Elevation
As of April 2026, we still see many home canners forgetting the “altitude tax.” Because water boils at a lower temperature at higher elevations, you must boil your jars longer to achieve the same level of sterilization.
For every 1,000 feet of elevation above the initial 1,000-foot mark, you must add one extra minute to your sterilization time.
| Altitude (Feet) | Sterilization Time (Minutes) |
|---|---|
| 0 – 1,000 | 10 minutes |
| 1,001 – 2,000 | 11 minutes |
| 2,001 – 3,000 | 12 minutes |
| 3,001 – 4,000 | 13 minutes |
| 4,001 – 5,000 | 14 minutes |
| 5,001 – 6,000 | 15 minutes |
| Above 6,000 | 16+ minutes |
Preparing Lids, Rings, and Jars for Success
While the jars are boiling, you need to prepare your closures. There is a lot of outdated information floating around about lids, so let’s set the record straight for 2026.
Proper Handling of Modern Canning Lids
If you are using modern two-piece metal lids (like Ball or Kerr brands manufactured after 2014), do not boil them. Boiling can damage or prematurely harden the red plastisol sealing ring, leading to a failed seal later.
The correct way to handle lids is to wash them in warm, soapy water and set them aside at room temperature. Some old-school recipes suggest simmering them, which is acceptable but usually unnecessary with today’s technology. Just ensure they are clean and free of any debris. Remember: lids are single-use only. Never reuse a lid that has already been processed, as the sealing compound will not work a second time.
Rings (or bands), on the other hand, can be reused as long as they aren’t rusted or bent. Wash them in warm soapy water along with your lids.
Cleaning vs. Sterilizing: The Initial Wash
Before any sterilization happens, a thorough cleaning is required. New jars often contain “glass dust” or cardboard debris from shipping. Reused jars might have stubborn residue from last year’s strawberry jam.
We recommend a detergent rinse and a thorough inspection. Look for:
- Hairline cracks: These will expand and burst under the pressure of canning.
- Nicks on the rim: Even a tiny chip on the top rim will prevent the lid from forming a vacuum seal.
- Cloudiness: If a jar is permanently etched or cloudy, it’s best to use it for dry storage rather than canning.
If you’re prepping a large batch of Quick and Easy Pickled Vegetables for Every Meal, you can run your jars through a dishwasher cycle first to handle the heavy cleaning, but a standard dishwasher cycle is not a substitute for boiling-water sterilization.
Debunking Alternative Canning Jars Sterilization Methods
The internet is full of “hacks” that claim to make canning easier. Unfortunately, many of these canning jars sterilization methods are dangerous or simply ineffective.
Why Oven and Microwave Methods Fail
- Oven Sterilization: Some suggest heating jars at 275°F (130°C) for 20 minutes. We strongly advise against this. Glass is a poor conductor of dry heat, and ovens often have “cold spots,” meaning some jars might not reach the required temperature. Furthermore, canning jars are not designed for dry oven heat; they can easily shatter, causing a dangerous mess and wasting your food.
- Microwave Sterilization: Heating wet jars for 30–60 seconds in a microwave is a popular tip. While it might kill some surface bacteria, it is not a standardized or reliable method for sterilization. It provides uneven heating and does nothing to sterilize the lids or ensure the entire jar has reached a safe temperature.
The Role of Chemical Sanitizers and Vinegar
- Vinegar Method: Some people fill jars with a mix of one-third white vinegar and two-thirds hot water, letting them sit for 10 minutes. While vinegar is a great cleaner and can help remove hard water scale, it is not a registered sterilant for canning. It won’t kill the heavy-duty spores that boiling water will.
- Hypochlorous Acid (HOCl): This is an effective sanitizer often used in industrial food settings. It can kill 99.99% of bacteria and viruses in under a minute. While it’s a fantastic tool for sanitizing your counters and equipment, the USDA still maintains that boiling water is the only approved method for the jars themselves in home canning.
Safety Precautions and Common Mistakes to Avoid
Even with the right method, a few small mistakes can lead to big problems. Here is how we stay safe in the Recipes Guard kitchen:
- Avoid Thermal Shock: Never put cold food into a hot sterilized jar, and never put a hot jar onto a cold granite countertop. Always place hot jars on a wooden cutting board or a lint-free towel.
- The 1-Hour Rule: Once a jar is sterilized and removed from the water, it stays “sterile” for about one hour. If you get distracted and the jars sit out longer than that, you must re-sterilize them.
- The Rim Wipe: After filling your jars, always wipe the rim with a clean, damp paper towel (some pros use a splash of white vinegar). Any bit of food, sugar, or salt on the rim will cause the seal to fail.
- Use a Rack: We cannot stress this enough. If jars sit directly on the bottom of the pot, they vibrate against the heat source. This leads to “bottom blowouts” where the entire base of the jar snaps off.
Frequently Asked Questions about Canning Jars Sterilization Methods
Do new jars straight from the box need to be sterilized?
Yes, they definitely need to be washed, but they only need to be sterilized if your recipe’s processing time is under 10 minutes. New jars are clean but not sterile; they can contain factory dust, chemical residues, or tiny glass shards.
How long can sterilized jars sit before they are no longer safe to fill?
Sterilized jars should be used as soon as they are removed from the boiling water. If they sit out for more than 60 minutes, they should be returned to the boiling water for another 10-minute cycle to ensure safety.
Can I reuse metal lids if I sterilize them again?
No. The sealing compound on the underside of the lid is designed to indent and “set” once. After one use, that compound is spent. Reusing lids is the number one cause of seal failure and food spoilage. You can, however, reuse the screw bands and the glass jars indefinitely as long as they remain in good condition.
Conclusion
Mastering canning jars sterilization methods is the “secret sauce” to long-term food preservation success. While it might seem like a lot of steps at first, it quickly becomes second nature. By sticking to the USDA-approved boiling water method and respecting the 10-minute rule, you can preserve your garden’s bounty with total confidence.
Whether you are making a simple batch of pickles or a complex fermented preserve, starting with a truly sterile environment ensures that your hard work won’t go to waste. For more expert tips on building your pantry, explore our full library of Preserving Basics. Happy canning!