Don’t Be a Crumb: The Ultimate Guide to Dehydration for Quick Breads
What You Need to Know About Dehydration for Quick Breads
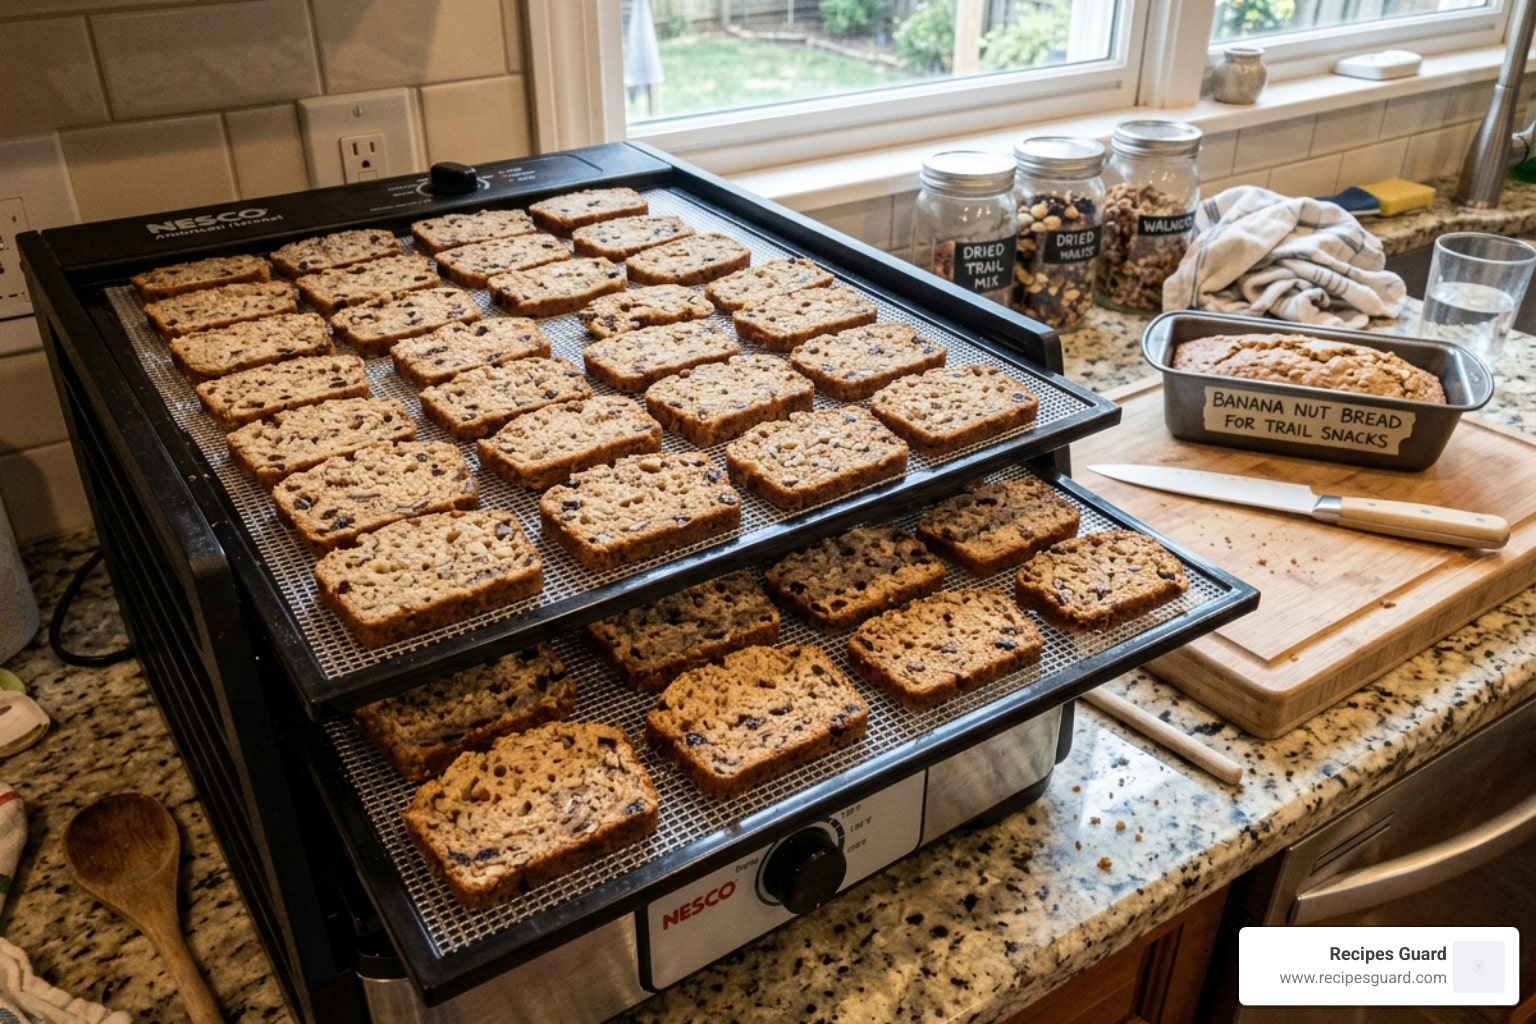
Dehydration for quick breads is one of the simplest ways to preserve baked goods for trail snacks, backpacking meals, or just reducing food waste at home.
Here’s the quick answer:
- Slice quick breads 3/8 inch thick (denser loaves like banana bread or carrot cake)
- Dehydrate at 125°F (52°C) for 4-5 hours in a food dehydrator
- Bread is done when it snaps cleanly with zero sponginess
- Fat-free options like angel food cake store for weeks to months
- Fat-containing breads (banana bread, carrot cake) keep for up to 2 weeks
- Store in an airtight container or vacuum-sealed bag
That’s the core of it. But getting consistently good results — the right texture, the right storage life, and zero spoilage — takes a little more know-how.
Quick breads are already a preservation-friendly format. They’re dense, they’re low in water compared to fresh produce, and they dry out evenly when sliced thin. The challenge is that most quick breads contain fats like butter or oil, which can go rancid over time. That changes how long you can safely store them after dehydrating.
Whether you’re turning leftover banana bread into crunchy trail cookies or drying angel food cake for a lightweight backpacking dessert, this guide walks you through everything — step by step.

Why Dehydrate Your Favorite Baked Goods?
We have all been there: you bake a beautiful loaf of zucchini bread or a rich banana-pecan cake, but you simply can’t finish it before it starts to lose its luster. While freezing is a classic option, dehydration for quick breads offers a unique “second life” for these treats.
At Recipes Guard, we are obsessed with finding ways to extend the storage life of food, and dehydration is a cornerstone of that mission. By removing the moisture, we aren’t just preserving the bread; we are transforming it into something entirely new—a lightweight, shelf-stable snack that packs a massive punch of flavor.
Backpacking and Trail Enhancements
If you are a hiker or backpacker, you know that every ounce in your pack matters. Carrying a fresh loaf of bread is impractical—it’s heavy, it gets squished, and it molds quickly in humid conditions. However, dehydrated quick bread is feather-light and nearly indestructible.
Imagine reaching the summit of a mountain in April 2026 and pulling out a handful of “Trail Angel Cake” or crunchy banana bread “cookies.” These aren’t just snacks; they are morale boosters. Dehydrated breadcrumbs can also be used as a meat binder for trail chili or to thicken up a fruit-based dessert by absorbing sweet juices.
Food Waste Reduction
In the average kitchen, quick breads often end up in the bin once they go stale. Dehydrating them turns “waste” into a high-value pantry staple. You can take those slightly dry end-pieces and turn them into gourmet DIY biscotti or croutons for your next salad. If you’re looking for new base recipes to experiment with, check out these Quick bread recipes to get started.
The Best Candidates for the Dehydrator
Not all breads are created equal when it comes to the drying rack. Here are our top picks:
- Angel Food Cake: This is the gold standard for long-term storage because it contains virtually no fat (oil or butter). It dries into a crisp, meringue-like treat that can last for months.
- Banana and Carrot Breads: These are dense and flavorful. While their fat content limits storage to about two weeks, the flavor concentration that happens during dehydration is incredible.
- Pita Bread: While not a “quick bread” in the cake sense, pita dehydrates beautifully at 125°F (52°C) in about three to four hours, creating a perfect scoop for hummus or a crunchy topping for soups.
The Step-by-Step Process of Dehydration for Quick Breads

Success in dehydration for quick breads comes down to two variables: surface area and temperature. If your slices are too thick, the outside will “case harden” (dry out and trap moisture inside), leading to mold. If they are too thin, they may crumble into dust.
1. Preparation and Slicing
Start with a fully cooled loaf. Trying to slice warm bread usually results in a jagged, crumbly mess. For denser loaves like banana-pecan cake or zucchini bread, use a serrated knife to cut slices exactly 3/8 inch thick.
If you are making “biscotti style” snacks, you can cut 1-inch thick slices and then halve those into 1-inch sections. For angel food cake, we recommend slightly thicker slices, around 1/2 to 3/4 inch, as the airy structure shrinks significantly.
2. Loading the Trays
Arrange the slices on your dehydrator trays with at least half an inch of space between them. Airflow is the engine of dehydration; if the trays are crowded, the drying time will double, and you risk uneven results.
3. Setting the Temperature
For most breads, we find that 125°F (52°C) is the “sweet spot.” It is warm enough to pull moisture out efficiently but cool enough that it won’t “toast” or cook the bread further.
However, if you are making DIY biscotti and want a harder, more professional crunch, you can bump the temperature up to 135°F (57°C).
4. The Drying Time
Drying times vary based on the density of the bread and the humidity in your kitchen.
- Neutral breads and Angel Food Cake: Approximately 4 hours.
- Denser Quick Breads (Banana/Carrot): 4 to 5 hours.
- DIY Biscotti: 4 to 8 hours depending on thickness.
Dehydration Comparison Table
| Method | Temperature | Time | Best For |
|---|---|---|---|
| Food Dehydrator | 125°F (52°C) | 4-5 Hours | Most quick breads, cakes, and pitas |
| Food Dehydrator (Biscotti) | 135°F (57°C) | 4-8 Hours | Thick 1-inch sections for dipping |
| Conventional Oven | 350°F (or less) | 15-20 Mins | Quick “flash drying” for immediate use |
5. The Crispness Test
Never trust the clock alone. To check if your bread is done, remove a piece and let it cool for two minutes (items often feel soft while warm). Once cool, try to snap it. It should break cleanly with a distinct “snap.” If there is any “give” or sponginess in the center, put it back in for another hour.
Best Practices for Dehydration for Quick Breads
To ensure your snacks stay fresh and tasty, follow these golden rules:
- Uniform Slicing: This is the most important factor. If one slice is 1/4 inch and the next is 1/2 inch, the thinner ones will over-dry while the thicker ones stay moist and spoil the whole batch.
- Use Cooling Racks: If using an oven, place the bread on a wire cooling rack set inside a baking sheet. This allows air to circulate under the bread, preventing a soggy bottom.
- Moisture Absorbers: When storing your dried bread, toss a small food-grade desiccant (silica) pack into the container. This combats “ambient moisture” that enters every time you open the jar.
- Airtight is Key: Glass Mason jars or vacuum-seal bags are the best. Plastic sandwich bags are too permeable for long-term storage.
Troubleshooting Your Dehydration for Quick Breads
Even experts run into hiccups. If your bread isn’t turning out quite right, consider these common fixes:
- Sticky Texture: This usually happens with high-sugar breads (like those with lots of honey or molasses). Sugar is hygroscopic, meaning it loves to hold onto water. If it’s still sticky after 6 hours, lower the temp to 115°F and extend the time.
- Uneven Drying: If the pieces near the fan are dry but the ones on the edges are soft, rotate your trays halfway through the process.
- Why is my bread already dry?: Sometimes the issue starts before the dehydrator. If your loaf was crumbly right out of the oven, it might be an ingredient issue. For help fixing the base recipe, see Why Is My Quick Bread Dry? Solutions to Fix the Problem.
Mastering Fat Content and Storage Longevity
This is where the science of dehydration for quick breads gets serious. At Recipes Guard, we specialize in understanding how food changes over time, and fat is the primary enemy of long-term storage.
The Fat Problem: Oxidation and Rancidity
Water is the primary cause of mold, but oxygen is the primary cause of rancidity. Quick breads like banana bread, pumpkin bread, and carrot cake are usually loaded with butter, oil, and eggs. Even when you remove the water through dehydration, the fat remains.
When fat is exposed to heat and oxygen, it begins to oxidize. This creates an “off” flavor—often described as soapy or metallic. Because of this, dehydrated quick breads containing fats are generally only suitable for storage for about two weeks.
The Exception: Angel Food Cake
If you want a dehydrated treat that can sit in your pantry for months, choose Angel Food Cake. Because it is made primarily of egg whites, sugar, and flour—with no added butter or oil—there is very little fat to go rancid. It is the ultimate “shelf-stable” cake.
Storage Duration Guidelines
- Fat-Free Cakes (Angel Food): 2–3 months in a cool, dark place (vacuum-sealed).
- Low-Fat Breads (Pita, some Soda Breads): 4–6 weeks.
- High-Fat Breads (Banana, Zucchini, Carrot): 2 weeks at room temperature. For longer life, store these in the freezer.
Creative Trail Snacks and Backpacking Desserts
Now for the fun part! Once you have mastered dehydration for quick breads, how do you actually use these crunchy delights?
1. DIY Quick Bread Biscotti
This is our favorite way to rescue a loaf that’s gone slightly stale. Slice the bread into 1-inch thick “fingers” and dry at 135°F until they are rock hard. These are perfect for dipping into coffee or tea. Since they are already “pre-toasted,” they won’t fall apart and turn into mush in your cup like fresh bread would.
2. Trail Cookies and Mix-ins
Crumble your dehydrated banana bread into small chunks and mix them with dried walnuts, dark chocolate chips, and dried cranberries. You’ve just created a “Banana Bread Trail Mix” that is far superior to any store-bought version.
3. The Ultimate Meat Binder
This is a pro-tip for backpackers. Before you dehydrate ground beef for your trail meals, mix in 1/2 cup of fine dehydrated breadcrumbs per pound of meat. When you rehydrate the meal on the trail, the breadcrumbs help the meat absorb water more effectively, preventing that “gravelly” texture often found in home-dried beef.
4. Trail Angel Cake
Take dehydrated angel food cake and pack it with a bag of dehydrated strawberries or pineapples. On the trail, add a little water to the fruit to create a syrup, then pour it over the cake. The cake will absorb the juice, turning back into a moist, fluffy dessert in seconds.
5. Chili Toppings
Use dehydrated savory quick breads (like cornbread or Irish soda bread) as “crunchy croutons” for your chili. They provide a wonderful texture contrast that crackers just can’t match.
Frequently Asked Questions about Dehydrating Breads
Can store-bought quick breads be successfully dehydrated?
Absolutely! In fact, store-bought pound cakes are excellent candidates for dehydration. Because they often contain stabilizers and preservatives, they sometimes dry even more uniformly than homemade versions. We have found that a store-bought vanilla pound cake, when sliced thin and dried, tastes remarkably like a high-end vanilla wafer. Just be aware that the texture may be slightly more “crumbly” than a dense homemade loaf.
Are there any quick breads not recommended for dehydration?
We generally advise against dehydrating breads with:
- Cream Fillings: Dairy-based creams do not dehydrate safely at home and can cause food poisoning.
- Heavy Frostings: High-fat buttercreams will simply melt in the dehydrator, creating a sticky mess on your trays.
- Fresh Fruit Chunks: If your bread has very large chunks of “wet” fruit (like whole blueberries), those spots will take much longer to dry than the bread, leading to potential mold pockets.
How do I re-crisp dehydrated quick bread if it loses its crunch?
If you live in a humid environment, your dehydrated snacks might absorb “ambient moisture” from the air and become “bendy” or soft. Don’t throw them away! You can “flash dry” them in an oven at 350°F (or less) for about 5 minutes. Alternatively, pop them back into the dehydrator at 135°F for 30 minutes. Once they cool down, they will regain their signature snap.
Conclusion
Mastering dehydration for quick breads is a game-changer for anyone interested in food preservation. It bridges the gap between the comfort of home baking and the practical needs of long-term storage and lightweight travel. Whether you’re prepping for a rugged expedition in the summer of 2026 or just trying to make the most of your kitchen leftovers, the dehydrator is your best friend.
At Recipes Guard, we believe that preservation is an art form. From understanding the delicate balance of fat oxidation to perfecting the “snap test,” every step you take brings you closer to a more sustainable and delicious pantry.
Ready to dive deeper into food security and flavor? Explore More info about preserving basics and join our community of preservation enthusiasts today. Happy drying!