How to Ferment Brazil Nuts Without Losing Your Mind
What Is a Brazil Nut Ferment Recipe (And Why You Should Try It)
A brazil nut ferment recipe combines raw Brazil nuts with a probiotic starter and water, then cultures the mixture for 24-48 hours to create a tangy, dairy-free cheese packed with beneficial bacteria.
Quick answer — basic Brazil nut ferment recipe:
- Soak 1 cup raw Brazil nuts (with 1 cup cashews optional) in cold water for 6-8 hours
- Drain and blend with water and 2 probiotic capsules (contents only)
- Culture at room temperature for 24-48 hours until bubbly and slightly sour-smelling
- Blend with coconut oil and sea salt until smooth
- Pour into a cheesecloth-lined mold and refrigerate 2-4 hours to set
- Store covered in the fridge for up to 3 weeks
If you’ve ever stared at a bag of Brazil nuts and thought “there has to be something more interesting I can do with these,” you’re right.
Fermenting Brazil nuts turns them into something genuinely surprising — a slightly crumbly, sweet-savory cheese with real depth of flavor. It’s dairy-free, gluten-free, and loaded with probiotics.
The process is simpler than it sounds. You don’t need special equipment or a culinary background. You need nuts, water, a probiotic source, and a little patience.
One thing worth knowing upfront: Brazil nuts don’t ferment ideally on their own. Their dense, high-fat texture works best when blended with cashews or macadamia nuts. That combination gives you a smoother, more balanced result — which is exactly what this guide covers.
Whether you’re a seasoned fermenter or just getting started with nut-based cheeses, this recipe is a reliable place to begin.

The Science and Benefits of a Brazil Nut Ferment Recipe
When we talk about a brazil nut ferment recipe, we aren’t just talking about a tasty snack; we’re talking about a nutritional powerhouse. In April 2026, as more of us move toward plant-based diets, understanding the “why” behind fermentation is just as important as the “how.”
The Selenium and Zinc Connection
Brazil nuts are world-renowned for their selenium content—a mineral essential for thyroid function and DNA synthesis. However, they are also an excellent source of zinc, which supports immune health and prostate health. By fermenting these nuts, we aren’t just eating them; we are making those minerals more accessible to our bodies.
Phytic Acid and Enzyme Activation
Nuts, like grains, contain phytic acid. This “anti-nutrient” binds to minerals and prevents your body from absorbing them. Fermentation is a form of pre-digestion. The bacteria break down phytic acid and activate enzymes, making the nuts significantly easier on your digestive system.
Probiotic Survival
One of the most exciting aspects of this process is the viability of the beneficial bacteria. Scientific research has shown that probiotics like L. casei in Brazil nut-based mediums maintain high counts (between 9.48 and 8.59 log CFU mL⁻¹) even after 28 days of refrigerated storage. Furthermore, Scientific research on Brazil nut probiotic survival indicates that these probiotics can survive the harsh conditions of the gastrointestinal tract, reaching the gut with counts high enough to provide real health benefits.
Bioavailability and Antioxidants
Fermentation doesn’t just preserve; it transforms. Studies on the Effects of fermentation on Brazil nut bioactive properties show that the process can enhance antioxidant activity. In some cases, fermentation with specific yeasts like S. boulardii has been shown to increase lysine content and improve the emulsifying capacity of the nut proteins, leading to a better texture in your finished cheese.
Essential Equipment and Ingredients for Your Brazil Nut Ferment Recipe
Before we dive into the blending, let’s make sure your kitchen is staged for success. We recommend using high-quality materials to ensure your “good bugs” thrive while keeping the “bad bugs” at bay.

The Ingredients
- Raw, Unsalted Brazil Nuts: Always start with raw nuts. Roasted nuts have had their natural enzymes destroyed by heat, which hinders the fermentation process.
- Raw Cashews or Macadamias: As mentioned in our intro, Brazil nuts are “nubbier” and denser. Mixing them 1:1 with cashews creates a much creamier, more “cheese-like” mouthfeel.
- Filtered Water: Chlorine in tap water can kill your probiotic starter. Use filtered or spring water.
- Probiotic Starter: You can use 2 high-quality probiotic capsules (discard the shells) or 1/2 teaspoon of probiotic powder. Some advanced fermenters use a splash of rejuvelac or even juice from a jar of raw sauerkraut.
- Coconut Oil (Refined): This helps the cheese firm up in the fridge, giving it a sliceable quality.
- Flavor Enhancers: Sea salt, nutritional yeast (for that “cheesy” umami), and a touch of apple cider vinegar.
The Equipment
- High-Speed Blender: Essential for getting that silky-smooth texture.
- Glass Jars: Avoid plastic or metal. Plastic can leach chemicals, and metal can react with the acids produced during fermentation.
- Cheesecloth or Nut Milk Bag: Used for straining out excess moisture if you want a firmer cheese.
- Silicone Spatula: Great for scraping every bit of that probiotic goodness out of the blender.
- Ramekins: Perfect for molding your cheese into beautiful wheels.
For those looking to expand their fermentation repertoire, check out More info about fermented recipes to see how these techniques apply to other plant-based foods.
Preparing the Nuts for the Brazil Nut Ferment Recipe
The first real step in any brazil nut ferment recipe is the soak. Because Brazil nuts are large and firm, they need a minimum of 6–8 hours (or overnight) in cold, filtered water.
This soaking serves two purposes:
- Softening: It makes the nuts pliable enough to blend into a cream rather than a gritty paste.
- Rinsing: It begins the process of neutralizing phytic acid.
Pro-Tip: You don’t need to peel the skins off the Brazil nuts! During the high-speed blending and subsequent fermentation, the skins dissolve and integrate into the mixture, contributing to the flavor and color. Once soaked, rinse the nuts thoroughly until the water runs clear. If you’ve ever tried our Don’t Be Afraid of the Funk with This Easy Fermented Garlic Recipe, you know that preparation is the key to a clean, successful ferment.
Step-by-Step Guide: Mastering the Fermentation Process
Now, we get to the “magic” part. This is where the bacteria go to work, turning a simple nut paste into a sophisticated, tangy cheese.
1. The Initial Blend
Place your soaked and rinsed nuts into the blender with 1 cup of filtered water and your probiotic starter. Blend on high until the mixture is as smooth as possible. It should look like a thick yogurt.
2. The Inoculation Phase
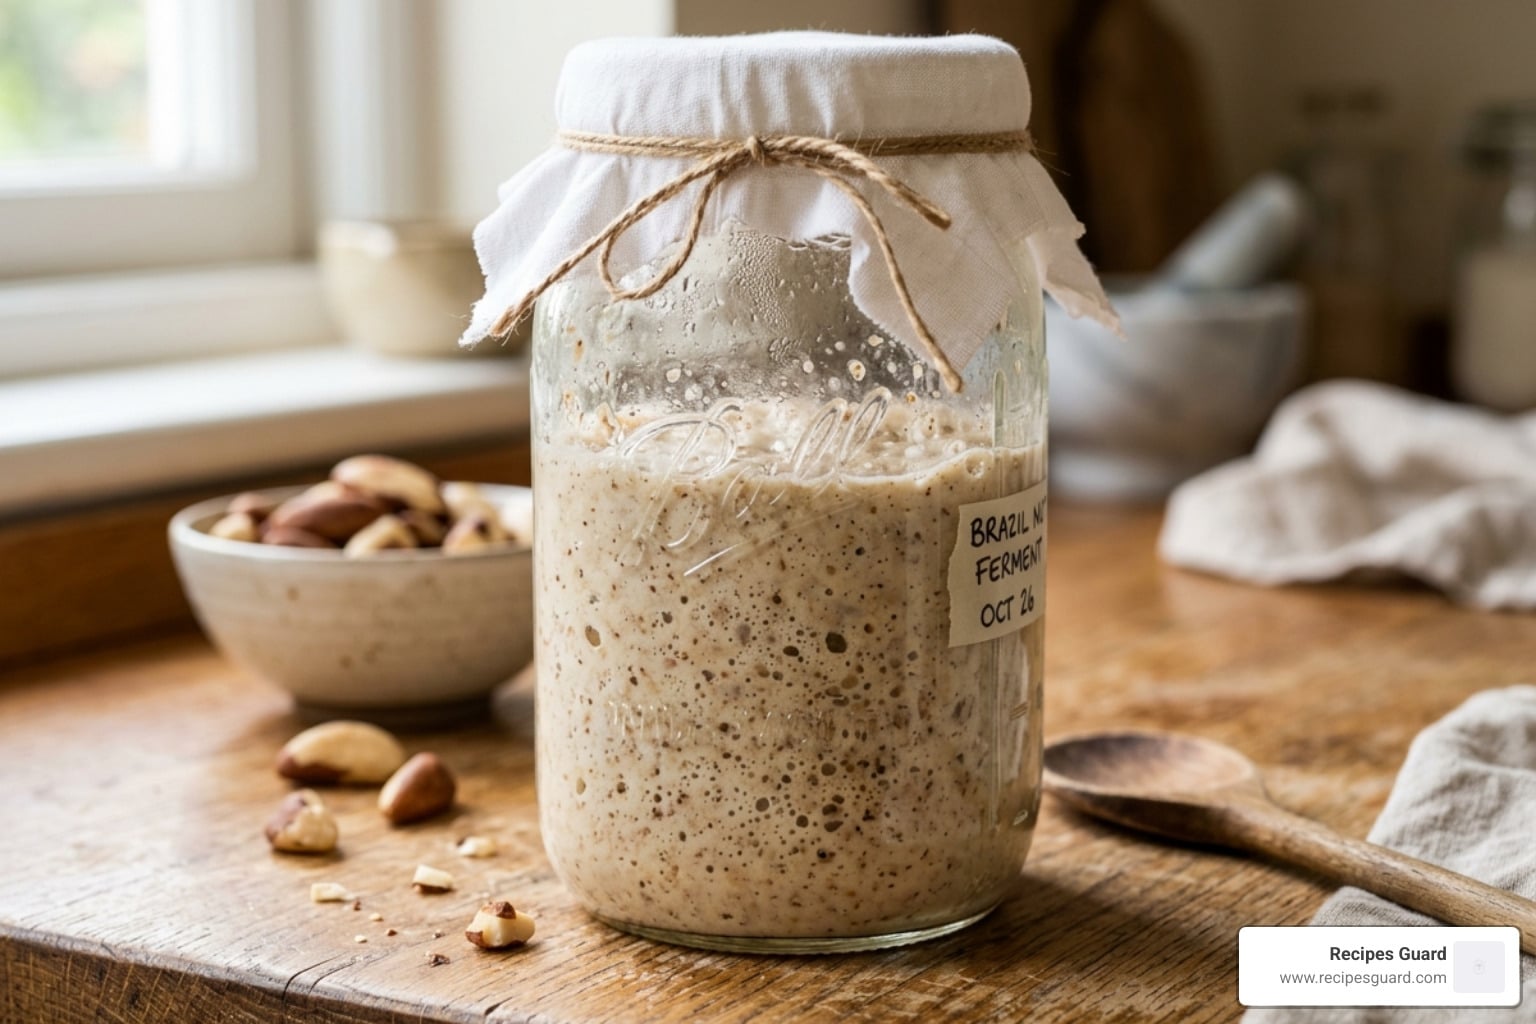
Transfer the mixture into a clean glass jar. Do not fill the jar to the top! Fermented nut cheese is famous for rising—it can often double in size as the bacteria produce gases. If you fill it too high, you might wake up to a “cheese explosion” on your counter. Cover the jar with a clean cloth or a loose lid to allow gases to escape while keeping dust out.
3. Culturing (The Wait)
Leave the jar in a warm, dark spot (ideally around 37°C or 98°F, though room temperature works fine).
- 24 Hours: Results in a mild, slightly tangy flavor.
- 48 Hours: Results in a sharper, more developed “aged” flavor.
During this time, you’ll see air bubbles forming throughout the mixture. This is a great sign! It means your probiotics are active and healthy. Much like Mastering the Art of Lacto-Fermented Hot Sauce, the culturing time is subjective; taste a small amount after 24 hours to see if it has reached your preferred level of “funk.”
4. Maturation and Setting
Once the taste is to your liking, blend the cultured mixture one more time with 1/3 cup melted coconut oil, 1 teaspoon sea salt, and a tablespoon of nutritional yeast. This stops the primary fermentation and prepares the cheese to set.
Achieving the Perfect Texture and Flavor
The beauty of a brazil nut ferment recipe is its versatility. You can steer the final product toward a spreadable “cream cheese” or a firm, sliceable wheel.
| Fermentation Time | Texture Profile | Flavor Profile | Best Use |
|---|---|---|---|
| 12-18 Hours | Creamy/Soft | Sweet & Nutty | Fruit dips, smoothies |
| 24 Hours | Spreadable | Tangy & Light | Bagels, crackers |
| 48 Hours | Crumbly/Firm | Sharp & Savory | Salads, cheese boards |
- For Sliceable Cheese: Increase the coconut oil slightly and ensure you strain the mixture through a nut milk bag for at least 2 hours before the final blend to remove excess moisture.
- Flavor Variations: Once the cheese is set, you can roll it in za’atar, cracked black pepper, or fresh herbs like chive and parsley. These “herb-rolled logs” look stunning on a vegan charcuterie board.
Advanced Tips: The “Old Cheese” Secret and Environmental Factors
Once you’ve mastered the basics, you can start playing with the “art” of fermentation.
The “Old Cheese” Secret
In the professional fermentation world, we often use a “backslop” method. Save about 1/2 cup of your finished Brazil nut cheese and add it to your next batch. This helps develop a unique “house culture” that becomes more stable and flavorful over time.
The Mineral Boost
Adding a small amount of dulse (seaweed) provides essential minerals that feed the probiotic cultures. It also helps prevent the growth of kahm yeast, that harmless but unsightly white film that can sometimes form on the surface of ferments.
Lunar Cycles and Temperature
Believe it or not, some traditional fermenters swear by the lunar cycle, noting that probiotic activity often peaks around the full moon. While the science on that is still being debated, the science on temperature is clear: keep your ferment in a stable, warm environment. Fluctuating temperatures can stress the bacteria and lead to off-flavors.
Before you start experimenting with advanced techniques, always refresh your knowledge on Safety First: A Guide to Preserving Fermented Foods to ensure your kitchen remains a safe environment for culturing.
Storage, Safety, and Shelf Life
You’ve done the work; now you need to protect your investment. Proper storage is the difference between a gourmet treat and a science project gone wrong.
Refrigeration
Once your cheese has fermented and set, keep it in an airtight glass container in the refrigerator. It will typically last for 3 weeks. The flavor will continue to develop slowly in the cold, becoming slightly sharper as the days go by.
Freezing
Can you freeze nut cheese? Yes! If you’ve made a large batch, you can freeze it for up to 2 months. The texture might become slightly more crumbly upon thawing, but the flavor and probiotic benefits remain largely intact.
Safety Checks: Sour vs. Foul
This is the most common concern for beginners.
- Safe: A tangy, sharp, or slightly vinegary smell. The color should be off-white or light cream.
- Unsafe: A “foul” or putrid smell (like rotting garbage). Any fuzzy mold (black, green, or red) means the batch should be discarded.
Research on Symbiotic drink stability and characterization shows that the pH of Brazil nut ferments decreases significantly during storage, which actually helps protect the food from spoilage. However, always trust your nose.
Frequently Asked Questions about Brazil Nut Fermentation
Can I use Brazil nuts as the sole nut for cheese?
Technically, yes, but we don’t recommend it for beginners. Brazil nuts have a very high fat content and a distinct “nobby” texture. On their own, the cheese can feel a bit oily and gritty. Blending them with cashews or macadamias creates the creamy, cohesive texture most people associate with cheese.
Do I need to peel the skins off Brazil nuts before fermenting?
No. The skins are quite thin and will break down completely during the high-speed blending process. They add a rustic, earthy depth to the flavor and save you a significant amount of prep time.
How do I know if my Brazil nut ferment has gone bad?
The “sniff test” is your best friend. A healthy ferment smells clean and acidic (like yogurt or sourdough). If it smells like ammonia, gym socks, or something “off,” the wrong bacteria have taken hold. Also, look for bubbles; a lack of bubbles after 48 hours in a warm room might mean your probiotic starter was inactive.
Conclusion
At Recipes Guard, we believe that food preservation is both a science and a joyful culinary experiment. Mastering a brazil nut ferment recipe is a fantastic way to bring the flavors of the Amazon into your kitchen while boosting your gut health with homemade probiotics.
Whether you’re spreading it on apple slices, crumbling it over a fresh salad with pomegranate arils, or serving it as a sophisticated za’atar-coated wheel at your next gathering, this cheese is sure to impress. Don’t be afraid to experiment with different culturing times and herb coatings to find your signature flavor.
Ready to dive deeper into traditional food prep? Explore our Preserving Basics Category for more guides on how to fill your pantry with healthy, fermented wonders. Happy fermenting!