How to calculate the perfect salt weight for salsa
Why Fermented Salsa Weight Recommendations Matter More Than You Think
Fermented salsa weight recommendations vary more than most guides admit — and getting them wrong is one of the top reasons batches fail.
Here’s a quick overview of the key weight benchmarks to know before you start:
| Ingredient | Recommended Range |
|---|---|
| Tomatoes | 1.5 to 6 pounds per batch |
| Salt | 2 teaspoons to 4 tablespoons per batch |
| Jalapeños | 0.5 to 4 peppers per batch |
| Garlic | 1 to 12 cloves per batch |
| Headspace in jar | 0.5 to 1 inch |
| Fermentation time | 2 to 5 days at room temperature |
These ranges exist because batch sizes vary a lot. A single quart jar and a four-quart batch need very different amounts of salt, produce, and weight pressure to ferment safely.
The good news? Once you understand the ratios, the process is straightforward.
Fermented salsa is one of the most beginner-friendly fermented foods you can make. Fresh vegetables are already coated in lactic acid bacteria — the good microbes that drive fermentation. Salt keeps bad bacteria in check while those good bacteria get to work. The result is a tangy, probiotic-rich salsa that can last months in the fridge.
But here’s the catch: all of that only works if your vegetables stay submerged under the brine. That’s where fermentation weights come in — and why choosing the right one for your jar size matters.

Why Submersion is Critical for Fermented Salsa

At Recipes Guard, we often tell our community that fermentation is essentially an invisible tug-of-war between “good” and “bad” microbes. To ensure the good guys (lactic acid bacteria) win, we must create an anaerobic environment. This simply means an environment without oxygen.
When we talk about fermented salsa weight recommendations, the primary goal is to keep every single piece of diced tomato, onion, and pepper below the liquid line. Why is this so vital?
- Mold Prevention: Mold is aerobic; it needs oxygen to survive. If a piece of onion floats to the surface and stays there, it becomes a landing pad for mold spores.
- Kahm Yeast Control: Unlike mold, Kahm yeast is generally harmless, but it looks like a white, wavy film and can make your salsa taste like old gym socks. Keeping things submerged minimizes the surface area where Kahm yeast can bloom.
- Lactic Acid Production: Lactic acid bacteria thrive underwater. As they eat the natural sugars in your tomatoes, they produce lactic acid, which preserves the salsa and gives it that signature zing.
Exposure to oxygen is the “fast track” to spoilage. If you’ve ever opened a jar only to find a fuzzy green layer on top, it’s likely because the produce wasn’t weighted down properly. For a deeper dive into keeping your ferments healthy, check out our Safety First: A Guide to Preserving Fermented Foods.
Fermented salsa weight recommendations by jar size
Choosing the right weight isn’t just about grabbing the heaviest thing in your kitchen; it’s about displacement and jar geometry. In April 2026, we are seeing a shift toward specialized glass weights that match the diameter of common mason jars perfectly.
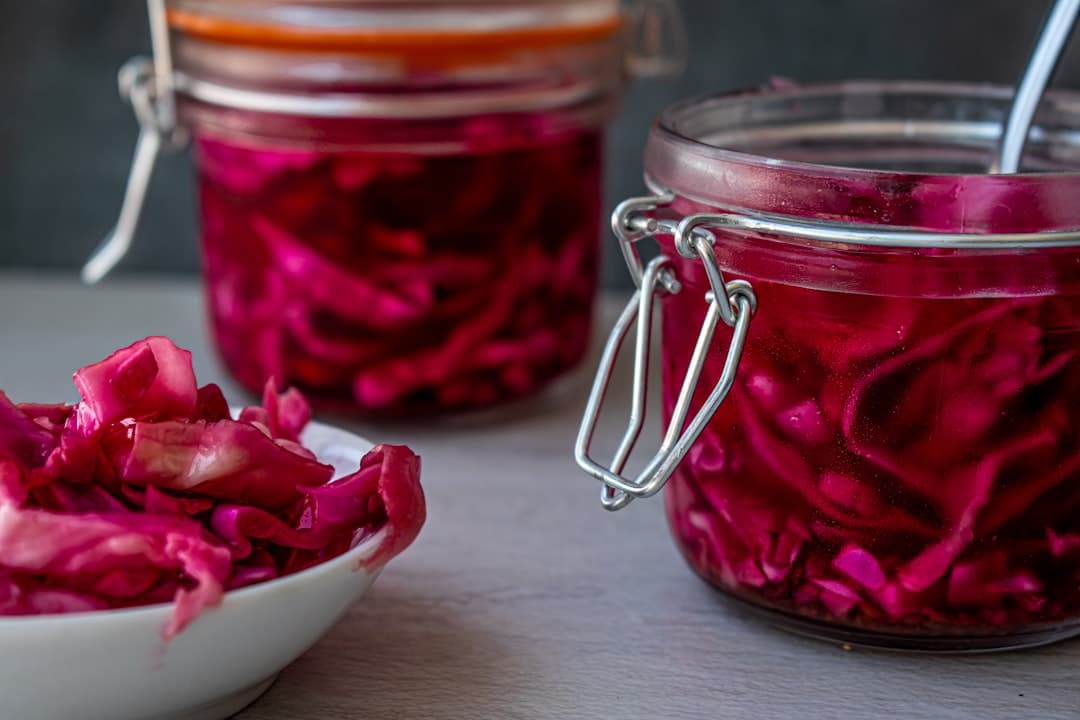
Wide-Mouth Quart Jars
For a standard 1-quart wide-mouth jar, a glass weight weighing approximately 6 to 7 ounces (roughly 170-200 grams) is ideal. This provides enough downward pressure to keep the salsa packed tightly without cracking the glass. You want a weight that covers at least 80% of the surface area of the salsa to prevent “floaters” from escaping around the edges.
Half-Gallon Vessels
If you are processing a large 6-pound batch of tomatoes, you’ll likely use a half-gallon jar. Here, you may need a heavier weight or even two stacked glass weights. The goal is to maintain about 0.5 to 1 inch of headspace between the top of the weight and the lid. This allows room for the salsa to bubble and expand as gases are created.
Small Pint Jars
For “test batches” or small gift jars, a smaller weight is necessary. However, be careful with displacement. If your weight is too large for a pint jar, it might push the brine right out of the top when you close the lid!
Scientific research on fermented vegetables suggests that consistent pressure actually helps the salt penetrate the cell walls of the vegetables more efficiently, leading to a crisper texture in your salsa.
Comparing the Best Types of Fermentation Weights
Not all weights are created equal. Depending on your budget and how often you ferment, you might prefer one over the other.
| Weight Type | Pros | Cons | Best For |
|---|---|---|---|
| Glass Pebbles | Non-porous, easy to clean, transparent. | Can be dropped and broken. | Daily use in wide-mouth jars. |
| Ceramic Stones | Very heavy, traditional feel. | Can be porous if not glazed; harder to sanitize. | Large crocks or deep jars. |
| Ziplock Brine Bags | Free/Cheap, fits any jar shape perfectly. | Risk of plastic leaching or bag popping. | Beginners or odd-shaped jars. |
| Cabbage Leaf | Edible, zero cost, creates a full seal. | Will eventually soften; needs a weight on top. | Keeping small seeds submerged. |
Glass Weights (Pickle Pebbles)
These are our favorites at Recipes Guard. They are specifically designed to fit into mason jars. Because they are clear, you can see if any air bubbles are trapped underneath, which you can then “burp” out.
Ceramic Weights
Often used in traditional stoneware crocks, these are excellent for heavy-duty fermentation. If you are making a massive batch of salsa to last the whole year, ceramic weights provide the heavy pressure needed for large volumes.
The “Follower” Method
A “follower” is a large, flat piece of vegetable (like a cabbage leaf or a slice of bell pepper) placed on top of the diced salsa. You then place a weight on top of the follower. This ensures that even the tiniest bits of cilantro or pepper seeds don’t float to the surface. For more on using vegetables in unique ways, see our guide on Mastering the Art of Lacto-Fermented Hot Sauce.
How to Calculate Salt and Produce Weights for Your Batch
Calculating the perfect salt weight is the “secret sauce” of a successful ferment. In fermented salsa weight recommendations, we generally aim for a salt concentration of 2% to 3% of the total weight of the vegetables.
The Tomato-to-Salt Ratio
Based on our research, a standard batch usually follows these guidelines:
- Small Batch: 1.5 pounds of tomatoes + 2 teaspoons of salt.
- Medium Batch: 3 pounds of tomatoes + 2 tablespoons of salt.
- Large Batch (The “Annual Harvest”): 6 pounds of tomatoes + 4 tablespoons of salt.
Why Weights Matter for Salt
When you add salt to diced tomatoes, the salt draws out the water through osmosis. This creates your brine. If you don’t use a weight, the vegetables won’t stay pressed into that brine, and the salt won’t be distributed evenly. This can lead to “soft spots” in your salsa where spoilage bacteria might take hold.
Customizing the Flavor Weight
Don’t forget the aromatics!
- Jalapeños: 0.5 peppers for mild, up to 4 for “fire-breathing” status.
- Garlic: We’ve seen recipes range from 1 clove to a whopping 12 cloves. If you love garlic as much as we do, you might enjoy our article: Don’t Be Afraid of the Funk with This Easy Fermented Garlic Recipe.
Pro Tip: Always use a digital scale. Measuring salt by volume (teaspoons) can be inaccurate because different salts (sea salt vs. kosher salt) have different grain sizes. Measuring by weight (grams) ensures your 2% brine is perfect every time.
Troubleshooting and Maintenance of Fermentation Weights
Even with the best fermented salsa weight recommendations, things can occasionally go sideways. Here is how we handle common issues.
Sanitization is Non-Negotiable
Before your weight touches your salsa, it must be clean. We recommend washing glass weights in hot, soapy water and then dipping them in boiling water for 30 seconds. Avoid using harsh chemicals like bleach, as these can leave residues that kill the very “good” bacteria we want to grow.
Floating Vegetables
If you see a piece of onion bypass your weight and float to the top, don’t panic! Simply use a clean, sanitized spoon to remove the floater or push it back under. This is why using a “follower” (like a cabbage leaf) is so helpful—it acts as a net.
Weight Displacement and “The Surge”
During the first 2 to 5 days of fermentation, the salsa will produce a lot of carbon dioxide. These bubbles can actually lift your weight up! This is why we “burp” the jars. By briefly opening the lid (or using an airlock), you release the pressure, allowing the weight to settle back down.
Flavor and Time
Does the weight affect the taste? Indirectly, yes. A well-weighted ferment stays crisper. If the vegetables are not submerged, they tend to become mushy and watery as the bacteria digest the pectin too quickly. By maintaining a solid submersion for the full 2 to 5 days, you ensure a crunchier, more vibrant salsa.
Frequently Asked Questions about Fermented Salsa
What are the best fermented salsa weight recommendations for beginners?
For those just starting out, we highly recommend using glass weights paired with wide-mouth mason jars. Wide-mouth jars are much easier to pack and clean than regular-mouth jars. Additionally, using a silicone fermentation lid (which allows gas to escape automatically) removes the stress of having to “burp” the jar daily. Ensure you have at least 1 inch of brine above your vegetables and that the weight is fully submerged.
Can I use household items as improvised weights?
Absolutely! If you aren’t ready to invest in glass weights, you can use:
- A Ziplock Bag: Fill a small freezer bag with a 2% salt brine (in case it leaks, it won’t ruin your salsa) and stuff it into the top of the jar. It contours to the shape of the jar perfectly.
- Glass Ramekins: If they fit inside the mouth of the jar, they work great.
- Clean Stones: Boil a smooth river stone for 10 minutes to sanitize it. Wrap it in a piece of cheesecloth or a cabbage leaf before placing it on the salsa.
- Heavy Vegetable Slices: A thick slice of onion or the “heel” of a bell pepper can act as a temporary weight, though they aren’t as heavy as glass.
How do fermented salsa weight recommendations affect fermentation time?
Proper weighting creates a more efficient anaerobic environment, which can actually speed up the initial phase of fermentation. In a warmer kitchen (above 75°F), your salsa might be perfectly tangy in just 2 days. In a cooler environment, it might take 5 days. Because the weight keeps the produce submerged, you can safely let it ferment longer to develop a deeper, more complex “funk” without worrying about mold.
Conclusion
Mastering fermented salsa weight recommendations is the final step in moving from a fermentation novice to a “modern pioneer” in the kitchen. By keeping your garden-fresh tomatoes, zesty peppers, and pungent garlic safely submerged under a salty brine, you are creating a probiotic powerhouse that can support gut health and brighten up your meals for months.
Once your salsa has reached the perfect level of tanginess (usually after 3-5 days), remove the weight, seal the jar tightly, and move it to cold storage (the refrigerator). In the cold, the fermentation process slows down significantly, allowing the flavors to meld and the probiotics to thrive for up to a year.
Ready to try more? Explore our full range of techniques in our Category: Fermented Recipes and start filling your pantry with the “good kind of funk”! At Recipes Guard, we believe that preserving the harvest is about more than just food — it’s about health, tradition, and a little bit of kitchen science. Happy fermenting!