How to Brew Simple Home Rice Wine Without Losing Your Mind
Essential Ingredients and Equipment for Simple Home Rice Wine
To begin your journey into simple home rice wine, you don’t need a laboratory or a commercial distillery. However, you do need a specific set of biological partners. Unlike grape wine, where the sugars are readily available for yeast to eat, rice is packed with complex starches. We need a “middleman” to chop those starches into bite-sized sugars.

Selecting the Right Rice and Yeast
The soul of your wine is the rice. While you can technically ferment any grain, the results vary wildly based on amylopectin content.
- Glutinous Rice (Sticky Rice): This is the gold standard. It contains nearly 100% amylopectin, which breaks down into a beautifully sweet, full-bodied liquid.
- Jasmine or Short-Grain Rice: These contain about 20% amylopectin. They result in a drier, thinner, and often sourer profile.
- Brown Rice: This requires much longer soaking (often overnight) and produces a nuttier, more rustic brew.
The Yeast Factor: Standard baker’s yeast (Saccharomyces cerevisiae) is great at making bread rise, but it struggles to break down rice starch on its own. For an authentic simple home rice wine, we use traditional starter cultures:
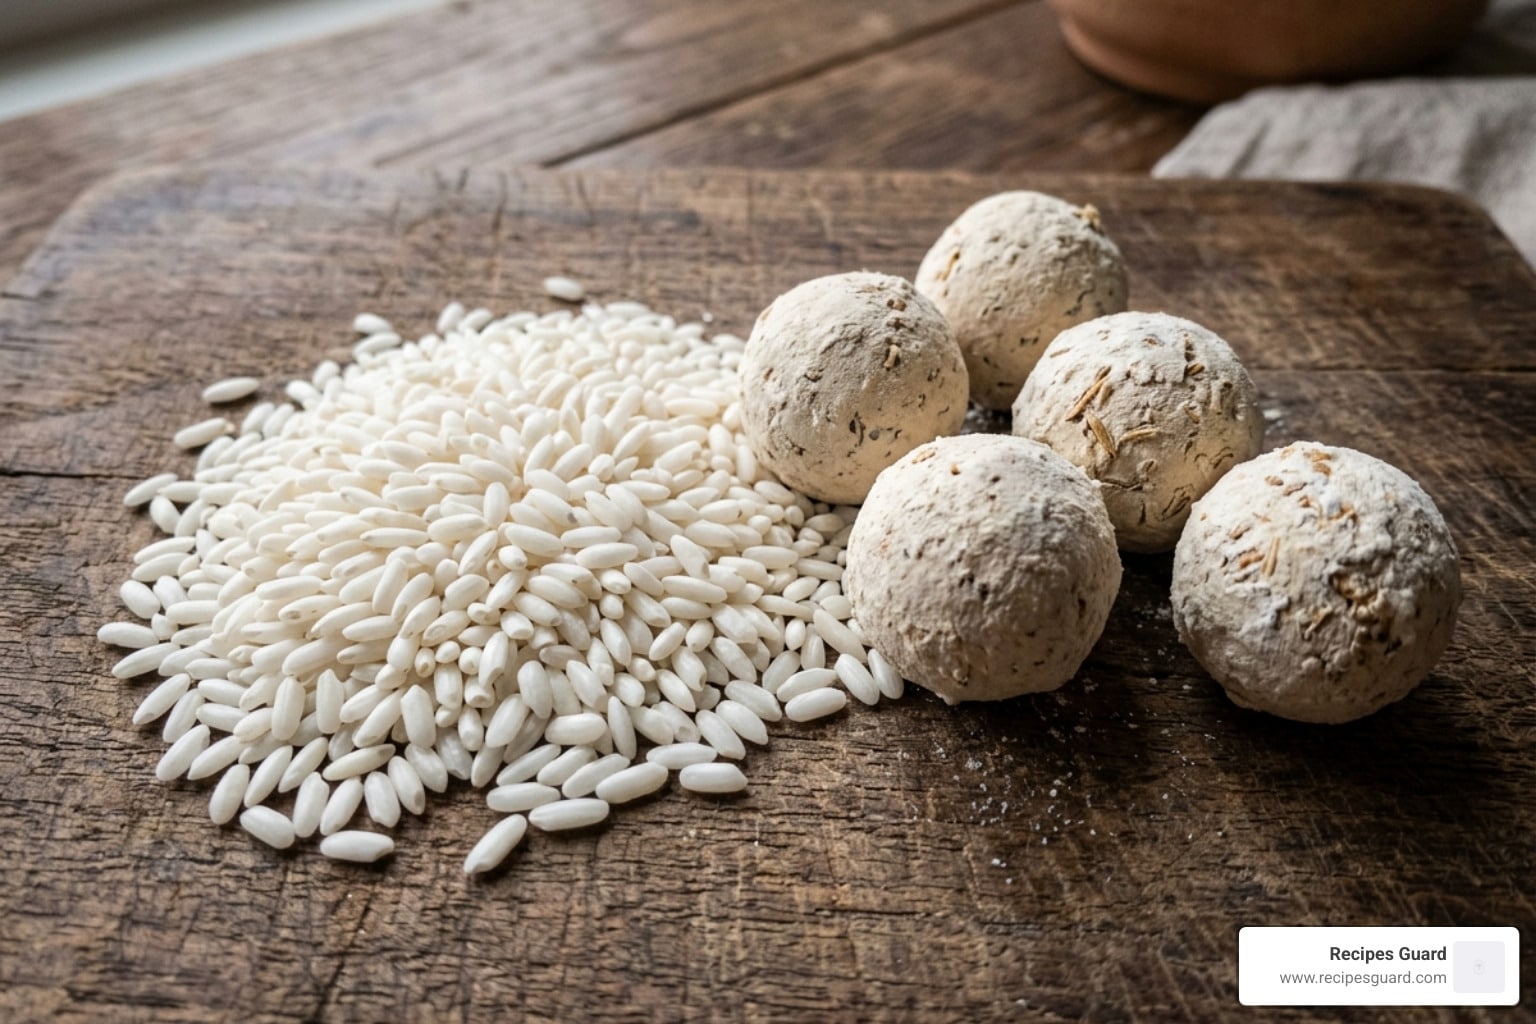
- Jiuqu (Chinese Wine Yeast Balls): These small, white, chalky balls contain both mold (to convert starch to sugar) and yeast (to convert sugar to alcohol). One small ball typically ferments about 500g of rice.
- Nuruk (Korean Starter): A dry cake made of grain (usually wheat) that harbors a wild collection of yeasts and enzymes. This is the key to the creamy, tangy profile of Makgeolli.
- Koji: Rice inoculated with Aspergillus oryzae, commonly used in Japanese Sake.
| Rice Type | Amylopectin Content | Final Outcome |
|---|---|---|
| Glutinous (Sticky) | ~100% | Sweet, high yield, classic flavor |
| Short-Grain (Sushi) | ~20% | Drier, more acidic, thinner body |
| Brown Rice | Variable | Earthy, complex, requires long prep |
For more on the fundamentals of food safety and grain selection, check out our guide on Preserving Basics.
Necessary Gear and Sanitation Steps
In April 2026, the “slow food” movement has made traditional ceramic jars (like the East Indian Bharani or Korean Hangari) popular again. However, a simple glass carboy or a large wide-mouth Mason jar works perfectly.
The Golden Rule of Fermentation: Sanitize Everything. We cannot stress this enough. If a “whisper” of oil, dish soap residue, or rogue bacteria enters your jar, your rice wine will transition from a delicious beverage to a science experiment gone wrong.
- Sterilization: Use boiling water or a food-grade sanitizer on your jars, lids, and stirring spoons.
- Avoid Contamination: Ensure your hands are scrubbed clean. Even the natural oils on your skin can interfere with the delicate mycelium growth.
- Breathability: You’ll need muslin cloth or a cheesecloth to cover the jar during the initial aerobic phase, allowing the yeast to breathe without letting fruit flies in.
According to scientific research on the role of sanitation in home fermentation, maintaining a clean environment significantly reduces the risk of pathogenic growth, ensuring your homebrew is safe for consumption.
The Step-by-Step Fermentation Process
Brewing simple home rice wine is a lesson in patience. You aren’t just cooking; you’re gardening a microscopic ecosystem.

Preparing the Rice for a Simple Home Rice Wine
The goal is “Al Dente” rice. If the rice is too mushy, it becomes a paste that the yeast can’t penetrate. If it’s too hard, the enzymes can’t get to the starch.
- Washing: Rinse your rice 3–4 times until the water runs clear. In traditional Korean brewing, some purists suggest washing the rice “100 times” to remove every trace of surface starch, though modern rice is usually clean enough after a few rinses.
- Soaking: Soak glutinous rice for at least 3 hours (or up to 12). Short-grain rice needs about 3 hours, while brown rice should soak overnight.
- Steaming: This is critical. Do not boil the rice. Steaming keeps the grains whole and separate. Steam for 30–40 minutes until the grains are translucent and tacky but not falling apart.
- Cooling: Spread the rice thin on a tray. It must cool to below 30°C (86°F). If the rice is even slightly too hot when you add the yeast, you will kill the microorganisms instantly.
For more inspiration on what to do with your grains, explore our Fermented Recipes.
Initiating and Managing Fermentation
Once the rice is cool, it’s time to inoculate.
- The “Well” Technique: After mixing your crushed yeast ball or Nuruk into the rice, pack it into your sterilized jar. Press it down gently, then use a clean handle to create a hole (a “well”) in the center. This allows you to monitor the liquid (the wine) as it pools at the bottom.
- Hydration: Some recipes, like Korean Makgeolli, require adding filtered water (about 1 liter per 1kg of rice) immediately. Chinese Jiuniang often uses very little or no added water, relying on the rice’s own moisture.
- Temperature Control: This is the most important variable.
- Chinese Style: Prefers a warmer environment (28-30°C).
- Korean Style: Prefers a cooler, slower ferment (18-24°C).
- Oxygen: For the first 2–3 days, the yeast needs oxygen to multiply. Stir the mixture once or twice a day with a sterilized spoon. After the initial “vigorous” phase, seal the jar with an airlock or a tight lid to begin the anaerobic phase, where the real alcohol production happens.
Monitoring and Harvesting Your Simple Home Rice Wine
How do you know when it’s done? Your senses are your best tools.

Determining Completion and Straining
A typical batch of simple home rice wine takes anywhere from 10 to 21 days to fully mature, though sweet “dessert” styles can be ready in just 3 days.
Visual Cues:
- The Floating Grains: Initially, the rice will absorb the liquid. As fermentation nears completion, the rice grains will lose their structure and begin to float or sink to the bottom, leaving a clear or cloudy liquid in the middle.
- Bubbling: In the first week, you’ll see active bubbling (effervescence). When the bubbles stop, the yeast has finished its primary meal.
The Taste Test: Sample a small amount with a clean spoon. It should taste sweet, slightly tangy, and have a noticeable alcoholic warmth. If it smells like vinegar or nail polish remover (acetone), the temperature was likely too high or oxygen exposure was too great.
The Harvest: Line a colander with a fine muslin cloth or a nut milk bag. Pour the contents in and squeeze—hard. The leftover rice sludge is called Jigaemi in Korea. Don’t throw it out! It’s highly nutritious and can be used in baking, as a soup thickener, or even as a traditional face mask.
Before you consume your first batch, always review Safety First: A Guide to Preserving Fermented Foods to ensure your brew has fermented correctly.
Bottling and Long-Term Storage
Once strained, you can drink the wine immediately, but “aging” it for even a few days in the fridge will mellow the flavors.
- Decanting: If you want a clear wine (like Cheongju), let the bottled wine sit in the fridge for 2 days. The sediment will settle at the bottom, allowing you to pour off the clear liquid into a new bottle.
- Carbonation Warning: If you bottle your wine early to keep the “fizz,” be careful. Fermentation continues even in the fridge. “Burp” your bottles (open the lid slightly to release gas) every day to prevent a “rice wine explosion” in your kitchen.
- Shelf Life:
- Refrigerated: Up to 1 year. The flavor will continue to evolve, becoming deeper and more complex.
- Room Temperature: About 6 months, provided the ABV is high enough (above 10%).
Homemade batches typically land between 9-12% ABV, which is significantly stronger than the 6% ABV found in commercial, diluted versions.
Troubleshooting and Flavor Customization
Even the best brewers face challenges. Here is how to handle the most common “hiccups” in the process.
Enhancing Flavor with Optional Additions
Once you’ve mastered the basic simple home rice wine, you can start “leveling up” the flavor profile.
- The “Christmas” Twist: Many traditional recipes incorporate black raisins and brown sugar. These don’t just add flavor; they provide extra fuel for the yeast, often resulting in a higher alcohol content and a darker, amber color.
- Acidity: A splash of lemon or lime juice can brighten a brew that feels too “heavy” or cloyingly sweet.
- Fortification: Some home brewers add a small amount (50ml to 100ml) of Gin or Vodka to the jar after the first 24 hours. This acts as a preservative, making the wine shelf-stable for many months at room temperature and adding a botanical punch.
- Spices: Ginger, cinnamon sticks, or even dried goji berries can be added during the secondary fermentation phase for a medicinal, aromatic finish.
Comparing Regional Styles: Jiuniang vs. Makgeolli
While the process is similar, the cultural “end goals” differ:
- Jiuniang (Chinese Sweet Rice Wine): This is often treated more like a “pudding” or a sweet soup base. It is fermented for a very short time (2-3 days) to maximize sweetness and minimize alcohol. It’s a favorite for poached eggs or as a breakfast tonic.
- Makgeolli (Korean Rice Wine): This is a “drinker’s wine.” It’s milky, sparkling, and tangy. It is almost always diluted with water before serving (usually a 2:1 wine-to-water ratio) to bring the ABV down to a sessionable 6-7%.
- Shaoxing Wine: This is a long-aged, amber-colored wine often used in Chinese cooking. It can reach up to 20% ABV and has a savory, “umami” profile that store-bought versions (full of salt and preservatives) simply cannot match.
Common Problems and Solutions
- Black or Green Mold: If you see fuzzy black, green, or bright orange spots, discard the batch. This is a sign of contamination or poor sanitation.
- White Mycelium: A thin, white, “dusty” layer on top of the rice is usually just the Jiuqu mold doing its job. This is safe.
- Excessive Sourness: This usually happens if the temperature was too high or if the jar was opened too frequently, allowing acetobacter (vinegar bacteria) to take over.
- No Activity: If your “well” hasn’t filled with liquid after 3 days, your yeast might have been old or the rice was too hot when you added it.
Frequently Asked Questions about Simple Home Rice Wine
How long does homemade rice wine last in the fridge?
When stored in a sterilized, airtight bottle, your rice wine will last up to one year in the refrigerator. Over time, the flavor will become less sweet and more “spirit-forward.” If you notice a foul smell or visible mold inside the bottle, it’s time to toss it.
Can I use regular bread yeast instead of wine yeast balls?
Technically, yes, but we don’t recommend it for beginners. Bread yeast cannot break down the starch in rice. To use it, you would first have to use an enzyme (like amylase) to convert the starch to sugar. Simple home rice wine is much easier to achieve using traditional yeast balls (Jiuqu) or Nuruk, which contain both the enzymes and the yeast in one package.
Why did my rice wine turn sour instead of sweet?
Sourness is usually caused by one of three things:
- Temperature: Fermenting above 30°C (86°F) encourages lactic acid bacteria to outpace the yeast.
- Oxygen: Too much air during the later stages of fermentation turns alcohol into acetic acid (vinegar).
- Rice Type: Using non-glutinous rice naturally results in a more acidic profile.
Conclusion
At Recipes Guard, we believe that fermentation is the ultimate bridge between cooking and chemistry. In April 2026, as more of us look for ways to create sustainable, preservative-free treats at home, brewing a simple home rice wine is a rewarding skill to master.
Whether you’re aiming for a sweet, probiotic Jiuniang to enjoy with poached eggs or a potent, aged Shaoxing-style wine for your kitchen pantry, the key is always the same: start with quality rice, keep your equipment spotless, and respect the temperature.
Start your fermentation journey with our curated Fermented Recipes and join a community of home brewers who are rediscovering the ancient art of the grain. Happy brewing!