Don’t Let Your Harvest Rot and Freeze Dry Fruit at Home Instead
Your Harvest Deserves Better Than the Compost Bin
Freeze drying fruit at home is one of the most effective ways to preserve your harvest — keeping up to 97% of nutrients intact and extending shelf life to 25 years or more.
Here’s a quick overview of how it works:
- Freeze – Fruit is frozen solid at temperatures between -30°F and -50°F
- Primary drying – A vacuum removes up to 90% of moisture through sublimation (ice turns directly to vapor)
- Secondary drying – Remaining surface moisture is pulled out, bringing total moisture removal to around 98%
- Store – Fruit is sealed in airtight, moisture-proof containers and stored in a cool, dark place
The result: crispy, lightweight fruit that tastes like it was just picked — without refrigeration.
You’ve put in the work to grow or source good fruit. Then life gets busy, and suddenly that beautiful batch of peaches is overripe on the counter. Sound familiar?
Unlike canning or dehydrating, freeze drying doesn’t use heat — so color, flavor, and nutrition stay remarkably close to fresh. And unlike freezing, your fruit doesn’t need electricity to stay preserved once it’s done.
The process does require some upfront knowledge (and ideally the right equipment), but it’s more accessible than most people think. This guide walks you through everything: the science, the gear, the step-by-step process, and how to store your results for the long haul.

Understanding the Science of Freeze Drying Fruit at Home
To master freeze drying fruit at home, we first need to look at the “magic” happening inside the machine. The scientific name for this is lyophilization. While it sounds like something out of a sci-fi lab, it is a process that has been used since WWII to preserve medical supplies and later by NASA for astronaut meals.
The core of the process is sublimation. In our daily lives, we are used to ice melting into water and then evaporating into steam. Sublimation skips the “wet” part entirely. By creating a deep vacuum, the ice crystals in the fruit turn directly into water vapor. This is why freeze-dried fruit maintains its original shape and size; it doesn’t shrivel up like a raisin because the cellular structure isn’t collapsed by heat or liquid water movement.
According to the How to Freeze Dry Fruit: Amazing Preservation Guide, this method removes about 98% of the water content. This results in incredibly low water activity levels (ranging from 0.08 to 0.330), which is the secret to its 25-year shelf life. Because there is almost no moisture, bacteria and mold simply cannot grow.
Here is how freeze-drying stacks up against other methods we often use at Recipes Guard:
| Feature | Freeze-Drying | Dehydration | Canning |
|---|---|---|---|
| Nutrient Retention | ~97% | ~60% | ~40% |
| Shelf Life | 25+ Years | 1–4 Years | 1–5 Years |
| Texture | Crispy/Airy | Leathery/Chewy | Soft/Soggy |
| Flavor | Concentrated/Fresh | Altered by heat | Cooked flavor |
| Moisture Removal | 98-99% | 70-90% | N/A (Added liquid) |
Essential Equipment and DIY Alternatives
If you are ready to dive into freeze drying fruit at home, you’ll need a few specific tools. While the investment can be significant, many find it pays for itself by reducing food waste and allowing for bulk purchases of seasonal produce at low prices.
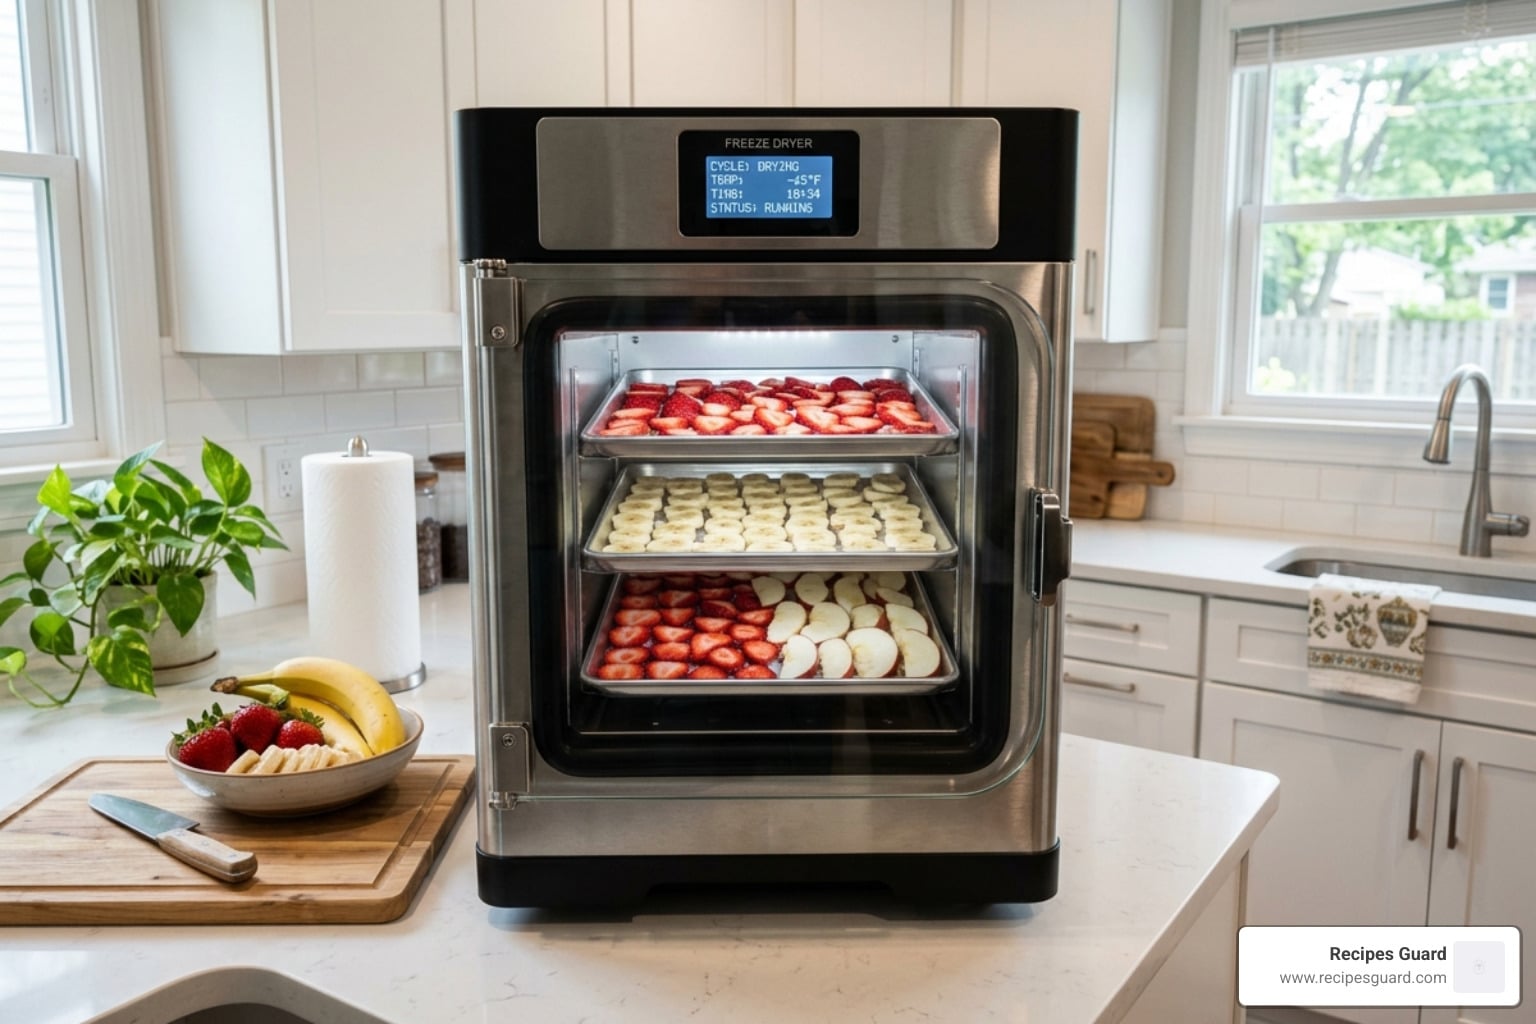
- Home Freeze Dryer: This is the star of the show. It consists of a vacuum chamber, refrigerated shelves, and a controller.
- Vacuum Pump: Most machines come with a pump that requires regular oil changes (unless you opt for a more expensive oil-free version).
- Mylar Bags & Oxygen Absorbers: For long-term storage, these are non-negotiable. Mylar blocks light and oxygen, while the absorbers pull out any residual air.
- Airtight Glass Jars: These are great for short-term snacking (up to a year) if you use a vacuum sealer attachment.
- Parchment Paper: Lining your trays prevents sugary fruits like pineapple from sticking.
For more on the fundamentals of keeping food fresh, check out our Preserving Basics section.

Limitations of Freeze Drying Fruit at Home Without a Machine
We often get asked: “Can I do this without a $2,000 machine?” The answer is sort of, but with big “buts.”
- The Freezer Method: You can place thin slices of fruit on a tray in a frost-free freezer. Over several weeks, the dehumidifying cycle of the freezer will slowly pull moisture out via sublimation. However, it takes a long time (up to a month), and the fruit is prone to freezer burn and picking up “freezer smells.”
- The Dry Ice Method: This involves a 1:1 ratio of dry ice to fruit. You place bagged fruit in a cooler with dry ice. As the dry ice sublimates, it creates an ultra-cold environment that pulls moisture out. This is faster than the freezer method (24–48 hours) but requires extreme safety precautions. You must wear heavy gloves, work in a ventilated area, and never seal the cooler lid tightly, or the gas buildup could cause an explosion.
While these DIY methods are fun experiments, they rarely achieve the 98% moisture removal needed for long-term shelf stability. They are better suited for “eat it soon” snacks.
Step-by-Step Guide to Preparing Your Harvest
Preparation is where you ensure the quality of your final product. You cannot “fix” bad fruit by freeze-drying it; if it’s mushy or tasteless now, it will be crunchy and tasteless later!
- Selection: Pick fruit at peak ripeness.
- Cleaning: Wash thoroughly and remove any bruises or blemishes.
- Slicing: This is the most important step. According to this How to Make Freeze-Dried Fruit at Home – A Step-by-Step Guide – Sweetz United, you should aim for uniform slices about 1/4 inch thick. Uniformity ensures that one thick piece doesn’t stay wet while the rest of the tray is finished.
- Pre-treatment: To prevent browning in apples, pears, or peaches, dip them in a solution of water and lemon juice or ascorbic acid.
Best Fruits for Freeze Drying Fruit at Home
Almost any fruit can be processed, but some are absolute superstars:
- Berries: Strawberries (sliced), blueberries, and raspberries. Pro-tip: For blueberries and grapes, you must “check” or puncture the skin with a fork, or the moisture will be trapped inside the skin.
- Tropicals: Mango and pineapple are favorites because their sugars concentrate into a candy-like crunch.
- Stone Fruits: Peaches and nectarines retain their vibrant summer color perfectly.
- Apples and Bananas: These are the classic “chips” of the freeze-drying world.
What to avoid: Fruits extremely high in fat, like avocados, don’t freeze-dry well for long-term storage because the fats can go rancid.
How Long Does the Process of Freeze Drying Fruit at Home Take?
Patience is a virtue in preservation. A typical cycle for freeze drying fruit at home takes between 24 and 40 hours.
Several factors influence this:
- Sugar Content: High-sugar fruits (like peaches or cherries) hold onto water tighter and take longer.
- Thickness: The thicker the slice, the longer the “path” for the vapor to escape.
- Pre-freezing: We highly recommend pre-freezing your trays in your regular kitchen freezer for 24 hours before putting them in the machine. This can shave 6–8 hours off your machine’s run time and reduces energy consumption.
Testing for Doneness and Long-Term Storage
How do you know when it’s actually done? If you pull the fruit out too early, the residual moisture will cause the whole batch to spoil in storage.
- The Snap Test: Take the thickest piece on the tray and break it. It should be brittle and snap cleanly. If it feels soft or “bendy,” it needs more time.
- The Cold Test: Touch the fruit. If it feels cold to the touch, it likely still contains ice/moisture.
- The Core Check: As noted in How To Make Freeze Dried Fruit: Step-by-Step – Gina’s Table, you should break a piece and look for dark spots in the center, which indicate remaining moisture.
Once confirmed dry, you must act fast. Freeze-dried fruit is like a sponge for humidity. If you leave it sitting on the counter for 20 minutes on a humid day, it will start to soften.
For 25-year storage, seal the fruit in Mylar bags with an oxygen absorber. Store these in a cool, dark place (ideally 68-70°F). If you prefer using glass jars, ensure they are stored in a dark pantry, as light can degrade the nutrition and color over time.
Creative Culinary Uses and Rehydration Tips
While we love eating these as “fruit chips,” there are so many other ways to use your stash:
- Fruit Powders: Crush “imperfect” pieces into a powder. This is a flavor bomb for frostings, cake batters, or home-fermented yogurt.
- Smoothie Boosters: Toss a handful of freeze-dried berries into your blender for intense flavor without watering down the texture with extra ice.
- Rehydration: To bring fruit back to its “fresh” state, use a 1:1 ratio of fruit to water. Warm water works faster. They won’t have the exact texture of a fresh peach, but they are perfect for pies or cobblers.
- Breakfast Bowls: Add them to oatmeal or cereal. They will stay crunchy until they hit the milk!
Frequently Asked Questions about Freeze Drying
Is freeze drying fruit at home safe from bacteria?
Freeze-drying does not kill bacteria or viruses; it essentially puts them into “suspended animation.” This is why sanitation is critical. Always wash your hands, use clean trays, and handle the fruit with care. If your fruit was contaminated before it went in, it will still be contaminated when it comes out. However, because the water activity is so low, those bacteria cannot multiply while the food is dry.
Can you freeze dry fruit that was previously frozen?
Absolutely! In fact, we prefer it. Using bags of frozen berries from the store is a great way to practice freeze drying fruit at home. Since the fruit is already frozen, the machine can skip the initial freezing phase and go straight to the vacuum, saving you time.
What are the most common freeze-drying mistakes?
- Overloading: Don’t stack fruit layers deep. Air needs to circulate.
- Uneven Slicing: Thin slices drying next to thick chunks lead to a ruined batch.
- Impatience: If in doubt, add two more hours of “Extra Dry Time.” It is better to over-dry than to end up with moldy food.
- Poor Sealing: Using cheap bags or old oxygen absorbers is the #1 reason for storage failure.
Conclusion
At Recipes Guard, we believe that mastering your food supply is a journey. Whether you are exploring fermentation or advanced preservation like freeze drying fruit at home, you are taking a step toward a more sustainable and healthy lifestyle.
Freeze-drying allows you to capture the peak of the harvest and enjoy it years down the line, whether as a quick snack for the kids or as part of a robust emergency food supply. Don’t let your hard work in the garden or your grocery budget go to waste.
Start your preservation journey with our comprehensive guides and discover how easy it is to keep your favorite flavors fresh forever!