Make Your Own Yogurt Starter from Scratch
Why Making a Natural Yogurt Starter at Home Is Worth It
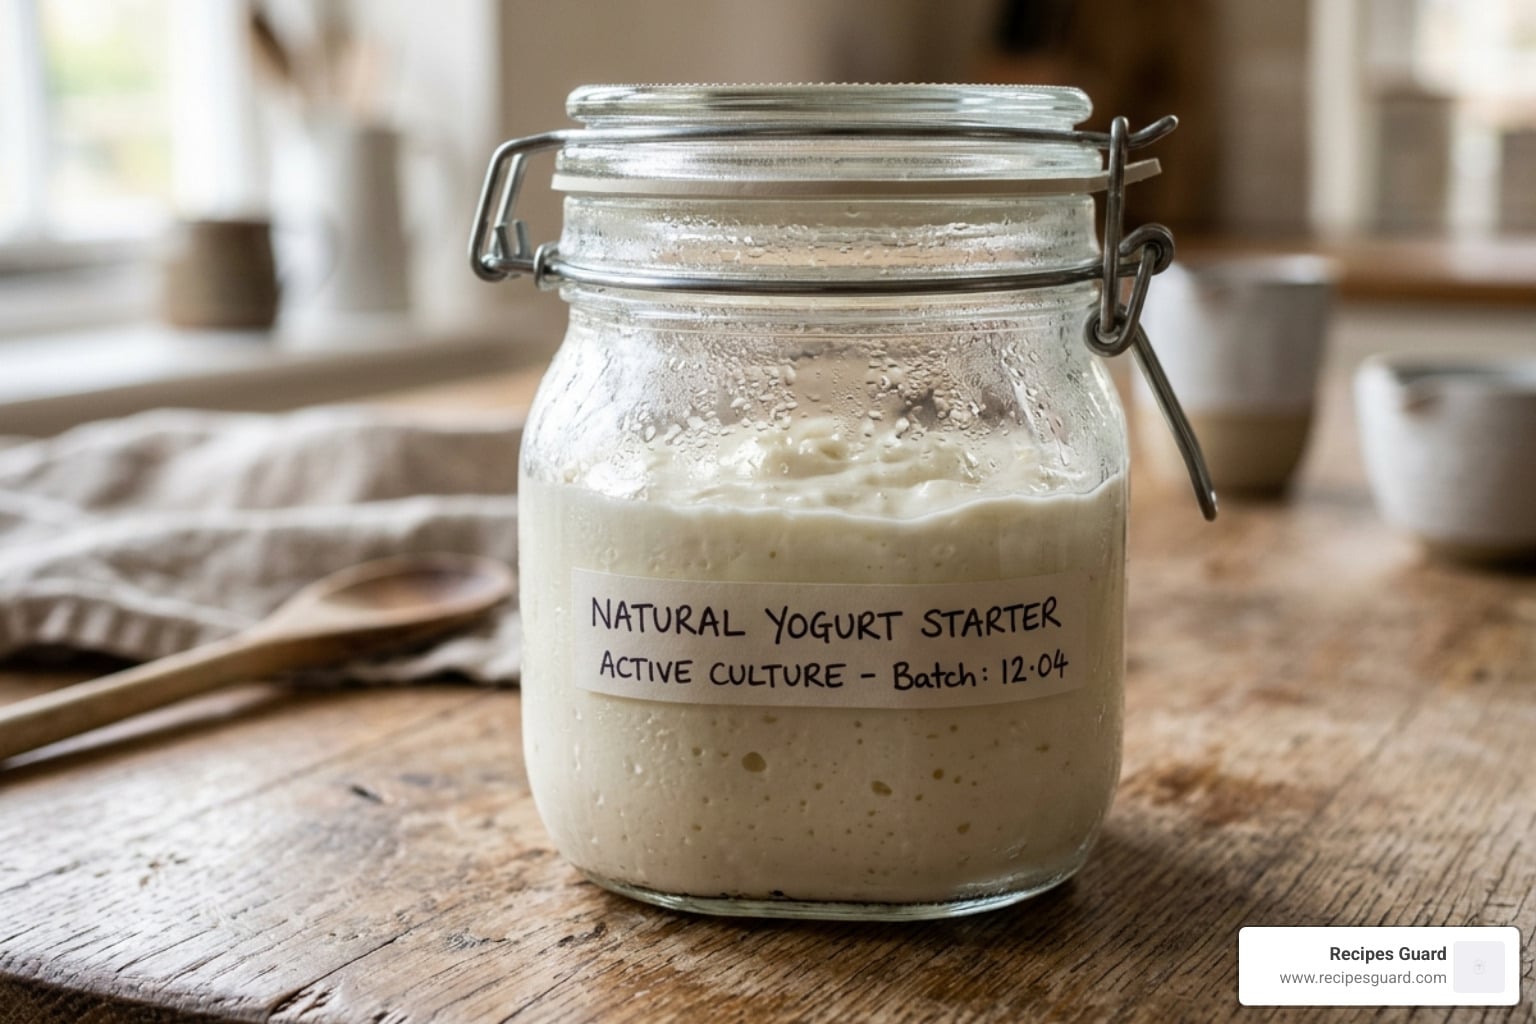
A natural yogurt starter is simply a small amount of live bacterial cultures added to warm milk to kick off fermentation — turning ordinary milk into thick, tangy yogurt. You can make one from scratch using ingredients you likely already have at home.
Quick answer — how to make a natural yogurt starter:
- Heat 1 cup of full-fat milk until warm (not hot — around 110°F/43°C)
- Add either 2 green chili peppers (with stalks) or 1 tablespoon of fresh lemon juice
- Cover and leave in a warm spot for 12 to 13 hours
- Use the result as a starter to culture your first batch of yogurt
- Reserve 1–2 tablespoons from each batch to keep the culture going indefinitely
Note: That first batch from chili or lemon is for culturing only — not for eating. The flavor and texture improve significantly with each successive batch.
It’s April 2026, and the fermentation revival is in full swing. More home cooks than ever are ditching store-bought yogurt — loaded with stabilizers, preservatives, and artificial thickeners — in favor of making their own from scratch.
And honestly? The results are remarkable.
Homemade yogurt costs a fraction of store-bought. A quart of whole milk runs about three dollars and yields a full quart of plain yogurt. That same amount in a premium store-bought brand can cost more than double.
But the real win is control. When you make your own starter, you know exactly what goes into your yogurt — nothing more than milk and live cultures.
The process does have a learning curve. Temperature matters. Timing matters. And if your culture isn’t strong enough, your yogurt won’t set properly. Those are exactly the problems this guide will help you solve.

The Science Behind a Natural Yogurt Starter
To understand why a natural yogurt starter works, we have to look at the microscopic world. Yogurt isn’t just “spoiled” milk; it is a carefully controlled fermentation where specific “good” bacteria consume lactose (milk sugar) and convert it into lactic acid.
At the heart of any authentic starter are three primary powerhouses:
- Lactobacillus bulgaricus: This strain is famous for protein digestion and soothing the upper GI tract.
- Streptococcus thermophilus: This worker bee converts lactose into lactic acid, making the milk more digestible for those with sensitivities.
- Lactobacillus acidophilus: Often added for its robust probiotic benefits and immune support.
When these bacteria go to work, the pH of the milk drops. This acidity causes the milk proteins to “denature” or unravel and then rebond into a mesh-like structure. This is what transforms liquid milk into a solid gel.

Beyond just texture, this process increases the bioavailability of calcium and other nutrients. There is even fascinating research in April 2026 regarding the “gut-brain axis,” suggesting that the neurotransmitter precursors produced by these specific strains can influence mood and mental clarity. To ensure you are getting the right strains, many enthusiasts use a Yogurt Starter Probiotics blend to guarantee purity and potency.
Benefits of Using a Natural Yogurt Starter
Why go “natural” instead of just buying a tub of commercial yogurt every time?
- Probiotic Potency: Commercial yogurts are often heat-treated after fermentation to extend shelf life, which kills the very bacteria you’re looking for. A fresh, home-grown starter is teeming with billions of live, active cultures.
- Digestive and Immune Support: Up to 70% of your immune cells live in your gut. By introducing diverse, potent strains, you’re essentially “training” your immune system.
- No Hidden Nasties: Most store-bought options contain pectin, cornstarch, or gelatin to fake a thick texture. A natural starter achieves that thickness through pure fermentation.
- Cost Savings: Once you have a “mother” culture, your only recurring cost is the milk itself.
For those who want the gold standard of health benefits, an Authentic Bulgarian Formula is often the preferred choice because it focuses on the original strains that built yogurt’s global reputation.
Choosing the Best Natural Yogurt Starter for Your Needs
If you aren’t ready to use chili peppers or lemons, you might look at commercial options. In DIY fermentation, you’ll encounter two main types:
- Direct-set starters: These are usually freeze-dried powder pouches (like the popular 3g pouches). They are convenient but can usually only be re-cultured two or three times before the bacteria weaken.
- Heirloom starters: These are the “wild” or multi-generational cultures. If you feed them fresh milk every seven days, they can literally last a lifetime.
A standard 3g pouch of a high-quality starter like Euro Cuisine RI1020 typically yields about 42 oz of yogurt per pouch, with a full 10-pouch box producing a massive 126 oz (3.7 liters). These are great for shelf-life stability, often lasting months in the refrigerator.
How to Create a Natural Yogurt Starter from Scratch
If you find yourself with a gallon of milk but no yogurt in the fridge to act as a “seed,” don’t panic. You can harness wild bacteria using traditional methods, such as those found in Indian Dahi (curd) making.
We often think of bacteria as something to avoid, but in fermentation, we invite the “funk” in. Whether you’re Mastering the Art of Lacto-Fermented Hot Sauce or making yogurt, the principle is the same: create an environment where the good guys win. If you’ve ever tried our guide to Don’t Be Afraid of the Funk with This Easy Fermented Garlic Recipe, you know that nature provides everything we need to start a culture.
Creating a Natural Yogurt Starter with Household Ingredients
There are two primary ways to catch the right bacteria from your kitchen:
The Green Chili Method: Green chili stalks are naturally covered in the specific types of bacteria that like to ferment milk.
- Boil 1 cup of full-fat milk, then let it cool until it is lukewarm (about 110°F).
- Take 2 whole green chili peppers. Wash them, but keep the stalks on. Drop them into the milk.
- Cover the container and keep it in a warm, dark place for 12 hours.
- The milk will look slightly curdled and smell a bit “off”—that’s your starter!
The Lemon Juice Method:
- Add 1 tablespoon of fresh lemon juice to 1 cup of lukewarm milk.
- Stir gently and cover.
- Let it sit for 12 hours in a warm environment (like an oven with the light on).
Crucial Tip: The resulting “yogurt” from these methods will likely be thin and taste a bit like chilies or lemons. Do not eat this first batch. Instead, take two tablespoons of this mixture and use it as the starter for a fresh quart of milk. By the third “generation,” you will have thick, creamy, delicious-smelling yogurt. Much like making Quick and Easy Pickled Vegetables for Every Meal, the first step is just getting the acidity right.
Maintaining an Heirloom Culture
Once you have a successful batch, you have an “heirloom” culture. To keep it alive:
- The Seven-Day Rule: You should ideally make a new batch of yogurt at least once every seven days. This keeps the bacteria active and prevents “bad” bacteria from moving in.
- Reserve Before You Eat: Before you add honey or fruit to your fresh yogurt, scoop out 2 tablespoons and put them in a small, clean glass jar in the back of the fridge. This is your “seed” for next time.
- Culture Strengthening: If you notice your yogurt is getting thin or taking longer to set, let your next batch incubate for an extra 2 hours. This “stresses” the bacteria slightly and encourages them to become more robust.
Step-by-Step Guide to Making Homemade Yogurt
Now that you have your natural yogurt starter, let’s make a full batch.
- Scald the Milk: Heat your milk (whole milk is best) in a heavy pot to between 180°F and 200°F. Do not let it boil over! This step is vital because it kills any competing wild bacteria and changes the protein structure so the yogurt sets firmly.
- The Cooling Phase: Let the milk cool down to 112°F (44°C). If you add your starter while the milk is too hot, you will cook the bacteria and end up with milk soup.
- Inoculation: Take about half a cup of the warm milk and whisk it into your 2 tablespoons of starter to thin it out. Then, pour that mixture back into the main pot and whisk gently.
- Incubation: This is where the magic happens. You need to keep the milk at a steady 110°F for 4 to 12 hours.
When handling fermented foods, we always emphasize Safety First: A Guide to Preserving Fermented Foods. Ensure your jars and whisks are spotlessly clean to avoid contamination.
Essential Equipment for Success
You don’t need fancy gadgets, but they certainly help with consistency.
| Method | Pros | Cons |
|---|---|---|
| Electric Yogurt Maker | Set it and forget it; perfect temp control. | Single-use appliance; takes up counter space. |
| Oven with Light On | No extra cost; uses existing equipment. | Temp can fluctuate; oven is out of commission. |
| Instant Pot | Very reliable; insulated. | Can sometimes run a bit too hot for some cultures. |
| Dutch Oven in Towels | Traditional; great for large batches. | Requires monitoring; temperature drops over time. |
A digital thermometer is the one piece of equipment we consider non-negotiable. Guessing the temperature with your finger is a recipe for a failed batch.
Milk Selection and Yield Statistics
The type of milk you choose dictates the final texture:
- Whole Milk: The gold standard. High fat and protein lead to the thickest, creamiest result.
- Skim/1% Milk: This will yield a much thinner, more “drinkable” yogurt.
- Dairy-Free Alternatives: Coconut and soy milk work best, but they often require a thickener like agar-agar or tapioca starch because they lack the protein structure of cow’s milk.
If you are using commercial pouches, remember the yield: one 3g pouch is designed for 42 oz (about 1.25 quarts) of milk. A standard 10-pouch box can produce up to 3.7 liters of yogurt, making it an incredibly economical way to feed a family.
Troubleshooting and Tips for Thick, Creamy Yogurt
Even experts have the occasional “runny” batch. If your yogurt looks more like kefir, check these common culprits:
- The Starter was Dead: If you used an old batch of yogurt that had been in the fridge for 3 weeks, the bacteria might have been too weak.
- Temperature Shock: If the milk was 120°F+ when you added the starter, you killed the culture.
- Disturbance: Don’t jiggle, stir, or move the jars while they are incubating. The protein mesh is fragile while it’s forming!
If you enjoy the science of troubleshooting fermentation, you’ll find similar challenges when Mastering the Art of Lacto-Fermented Hot Sauce, where salt ratios and oxygen exposure are key.
Achieving the Perfect Consistency
To get that “standing spoon” thickness:
- The 20-Minute Hold: When heating your milk to 180°F, don’t just reach the temp and turn it off. Hold it there for 20 minutes. This evaporates some water and denatures more whey protein, leading to a much thicker set.
- Add Milk Powder: Whisking in 1/2 cup of dry milk powder to your liquid milk before heating adds extra protein and “body.”
- Strain It: To make Greek-style yogurt, pour your finished yogurt into a colander lined with cheesecloth or a coffee filter. Let the yellowish liquid (whey) drain out for 2–4 hours in the fridge.
Safety Precautions and Storage
- Sterilization: Always wash your jars in hot, soapy water (or a dishwasher) before use.
- Storage: Homemade yogurt lasts about 14 days in the refrigerator. After that, the flavor becomes very tart, and the culture begins to weaken.
- Avoid Ultra-Pasteurized (UHT) Milk: This milk has been heated so high that the proteins are “broken” and often won’t form a solid yogurt. Look for “Pasteurized” or “VAT Pasteurized” instead.
- Signs of Spoilage: If you see pink, orange, or black fuzzy mold, or if it smells like yeast or old cheese, toss it. When in doubt, throw it out!
Frequently Asked Questions about Natural Yogurt Starters
How long can I store my yogurt starter for maximum shelf life?
Freeze-dried pouches are the winners here; they can last up to a year in the freezer or several months in the fridge. If you are using a fresh natural yogurt starter (a scoop from your last batch), it is at its most potent for the first 7 days. By day 14, it can still work, but you may need a longer incubation time. By April 2026, many starters come with clear “potency guarantees” on the label—always check those dates!
Can I use a natural starter for Greek yogurt or non-dairy milk?
Yes! “Greek yogurt” is simply regular yogurt that has had the whey strained out. Any natural yogurt starter can make Greek yogurt. For non-dairy milks like soy or coconut, you can use the same starter, but be aware that you cannot usually “re-culture” from a non-dairy batch. You’ll need to use a fresh scoop of dairy-based starter or a new powder pouch each time.
Why did my yogurt fail to set or turn out runny?
The most common reason is temperature. If your house is cold and your “warm spot” dropped below 100°F, the bacteria simply went to sleep. Another hidden culprit is “antibiotic milk.” If the cows were recently treated with antibiotics, trace amounts can end up in the milk and—you guessed it—kill your yogurt starter. Switching to organic milk often solves this.
Conclusion
Making a natural yogurt starter and your own homemade yogurt is one of the most rewarding “kitchen chemistry” projects you can undertake. It connects you to a tradition that spans thousands of years, saves you money, and provides a level of probiotic health that store-bought brands simply can’t match.
At Recipes Guard, we believe that understanding the “why” behind fermentation makes the “how” much easier. Whether you’re just starting your journey or you’re a seasoned pro, the key is patience and a little bit of curiosity.
Ready to dive deeper into “the funk”? Start your fermentation journey with our full guide to fermented recipes and discover how easy it is to preserve your own food at home. Happy fermenting!